This is how easy it is to publish your sites online with FileZilla
FileZilla is an open source FTP software program. It has an extremely clear interface, which provides a lot of functions. FileZilla can be operated very easily and has a tidy local and server-side directory view. What is FTP and how can I use it?
The FileZilla FTP Client is available for Windows/Mac/Linux:
 https://filezilla-project.org/download.php?show_all=1
Overview of the most important functions
- Resuming uploads and downloads
- Management of different FTP sites
- Adjustable commands
- Keep-alive system
- Timeout recognition
- Firewall support
- SOCKS4/5 and HTTP1.1 proxy support
- SSL (secure connections)
- SFTP Support
- Upload/download queue
- Drag & drop
In this manual, we will briefly show you how to operate the FileZilla FTP Client. FileZilla does not need to be configured by default, thus, you can start working with the program right away.
After you have installed and started FileZilla, the program window will open automatically. As with most other FTP programs, this window is divided into several areas.
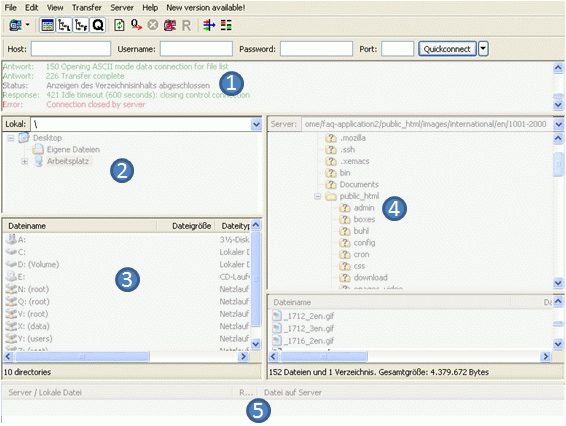
(1): The communication with the server is illustrated in the window.
(2) and (3): Window with directory trees and file lists on the local hard drive
(4): Window with directory trees and file lists on the server page (web space)
(5): A window in which the files to be transferred are listed - the "waiting list" or "queue".
Note: If you would also like to have a "divided" view of the directory trees and file lists on the server page, click below the menu bar on the button  .
.
 .
.Connecting to an FTP server
Enter your FTP data under the menu bar:

- Server: desiredname.de (instead of "desiredname.de", enter your own domain.)
- Server: desiredname.de (instead of "desiredname.de", enter your own domain.)
- Password: Your master password
The "Port" input field can remain empty. If you would like to establish a connection to the server now, click on the Connect button.
After a successful connection attempt, a list with the file and folder names will appear in the right side of the main window (figure 1 (4)). The name of the current folder is displayed in the "server page" input field above the list. The folder name "/" stands for the topmost directory that you have access to as a user.

You can change to the current folder by double-clicking on a folder name or by typing the folder names into the input field and pressing the [Enter] key. You can also right-click on a file or folder name and select Open from the context menu in order to open the file or folder.
Transferring /deleting files
You can transfer an individual file by double-clicking on the file name. This causes the file to be transferred to the list of files to be transferred (figure 1 (5)), and the FTP transfer will start automatically.
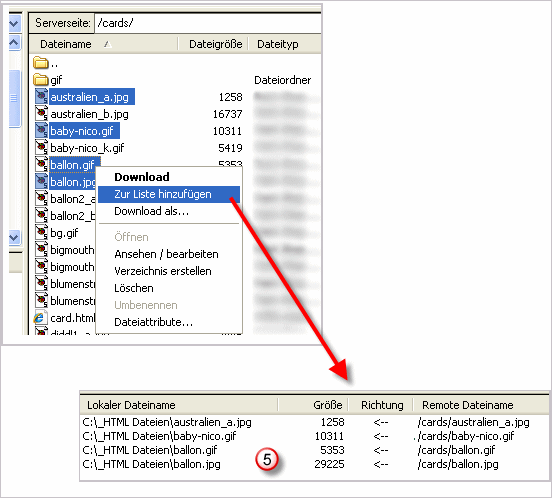
In order to transfer folders and/or multiple files, select them and right-click on the selection: In the pop-up menu that opens, simply click on "Upload" or "Download".
You can also transfer files from one page to the other with drag and drop. drag and drop
 With an FTP program, you can also delete files and/or entire directories. If you delete all content, the visitors to your website will no longer see any content. With an FTP program, you can also delete files and/or entire directories. If you delete all content, the visitors to your website will no longer see any content.
Simply highlight the content that you do not want and right-click it. If you select the delete option, the content will be deleted from your web space after a security prompt. |
In order to add files to the queue to transfer at a later point in time, first select the desired files with the mouse and then select Add to list from the pop-up menu. You can also directly drag file names into the queue.
Once the queue has been prepared, click on the
 button in order to start the file transfer. If you would like to create and save several FTP connections, please click on the
 symbol below the menu bar. After this, a window will open in which you can set up and manage your FTP access.
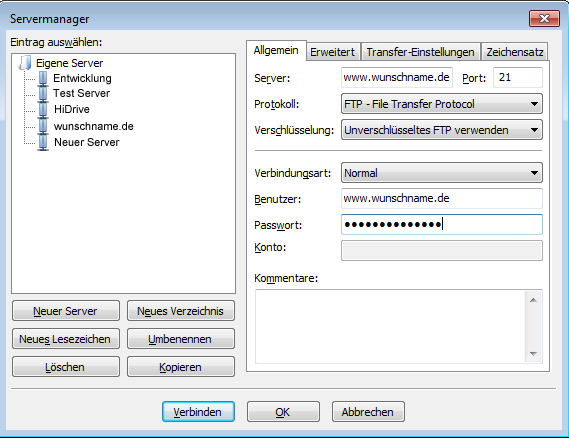
The server data is entered by clicking on the New Server button. We recommend enabling the passive mode. Please click on the Transfer Settings and highlight the passive mode under New Server .
