How to configure your secondary IP address
This article explains how to order a secondary IPv4 address for your server and then add it manually in the various operating systems.
The V-Server
No server settings are necessary for a Linux V-Server. Configuration of the IP addresses is determined by the virtualisation. You only need to restart the server. The secondary IP address is then set up on the server and operational.
Ordering the secondary IP address
You must first order a secondary IP address if you want to configure it on a server. To do so, enter your customer number and password to log into your STRATO Customer Login. Go to the Overview of your package and select Start for your server package to access your STRATO Server Login. If you access your package directly, select Manage Settings.
You can then order additional IP addresses under the menu items My Server / Server Extensions.
It is shown in the Network menu as Item 1 Additional Ipv4 Address or as Secondary IP Address. Select the item with your preferred contract term and then place your order.


It will usually take around 15–30 minutes to set up your secondary IP address. As soon as your secondary IP address is fully set up, it will be shown under the menu item Network & Load/IP Addresses in your STRATO Server Login.

The following steps to manually add the 2nd IP address to your server differ depending on the operating system
Adding the secondary IP address to your Linux server (CentOS 7 & 8 with the network manager).
Network manager is used to configure the network in CentOS 7 and CentOS 8. Use the comman nmcli in this case.
First check the current configuration and identify which device the connection is assigned and under which name.# nmcli connection showNAME UUID TYPE DEVICEeth0 03da7500-xxxx-xxxx-xxxx-xxxxxxxxxxxx ethernet eth0
In the example above, the name of the connection is eth0.
Enter the additional IP address and corresponding data:# nmcli connection modify <connection name> +ipv4.addresses <IPv4-Adress>/32
Activate the configuration and reload.# nmcli connection up <connection name># nmcli connection reload
Next check the settings:# nmcli connection show <connection name>
Finally, to be on the safe side, mark that these settings should be loaded when the system starts:# nmcli connection modify <connection name> connection.autoconnect yes
A last check to display the IP configuration:# ip address
The secondary IP address will now also be shown for the primary interface.
Adding the secondary IP address to your Linux server (Debian 11 and Ubuntu 16 with the networking service).
In Debian and Ubuntu 16, the file /etc/network/interfaces is mainly responsible for the network configuration. Proceed as follows to change this file (changes are marked in bold type):
# This file describes the network interfaces available on your system# and how to activate them. For more information, see interfaces(5).source /etc/network/interfaces.d/*# The loopback network interfaceauto loiface lo inet loopback# The primary network interfaceauto eth0allow-hotplug eth0iface eth0 inet dhcpauto eth0:0allow-hotplug eth0:0iface eth0:0 inet static address <secondary IP address>/32# The secondary network interfaceallow-hotplug eth1iface eth1 inet dhcp
Restart the networking service if you have made any changes.systemctl restart networking.service
A last check to display the IP configuration:# ip address
Die 2. IP-Adresse wird jetzt ebenfalls bei der primären Schnittstelle mit angezeigt.
Adding the secondary IP address to your Linux server (Debian 12 and Ubuntu 18/20/22/24 with netplan)
Since Ubuntu 18.04 LTS, network configuration has been managed using netplan.
Bring up the settings directory for netplan:# ls /etc/netplan/01-netcfg.yaml
Create a backup of the settings and edit the file you then find (usually 01-netcfg.yaml):# cp /etc/netplan/01-netcfg.yaml /root# nano /etc/netplan/01-netcfg.yaml
Change the range for the first interface (here eth0) as follows (changes compared to the original settings are in bold type):network: version: 2 renderer: networkd ethernets: eth0: dhcp4: yes addresses:[ <secondary IP address>/32 ] eth01: dhcp4: yes
Now test the configuration:# netplan try
Then you have time to check the availability of your server via the secondary IP address. Press Enter to confirm the settings if everything is okay. The old settings will be reactivated if you do not confirm.
A last check to display the IP configuration:# ip address
The secondary IP address will now also be shown for the primary interface.
Adding the secondary IP address to your Windows Server 2012
You need to make a few manual settings to configure your assigned secondary IP address on the server. Proceed as follows:
Log into your server. (Select Start / All Programs / Accessories / Remote Desktop Connection)
On your Windows Server, now select Start (bottom left button with 4 tiles) / Control Panel / Network Status and Tasks (in the Network and Internet section) / Ethernet to access the Ethernet Status window. Once there, click on the Properties button.
Now click on Internet Protocol Version 4 (TCP/IPv4) and select the Properties button again to access the Internet Protocol (TCP/IPv4) properties.

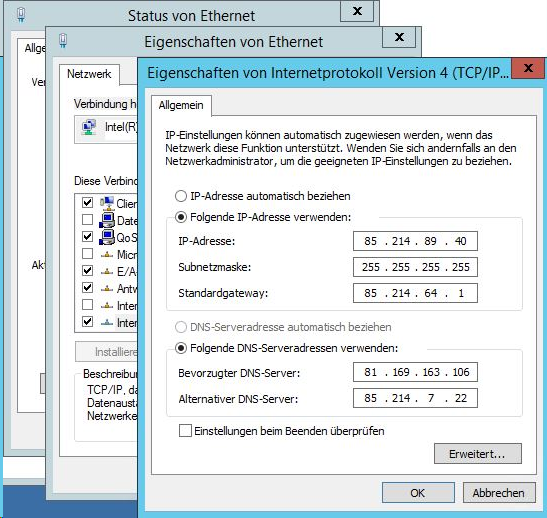
The IP address and DNS server address are obtained automatically in the standard configuration. Manual configuration is necessary if you want to use a secondary IP address.
Mark the option Use the Following IP Address.
| IP-Adress: | Enter the primary address for your server here. |
| Subnet mask: | Enter 255.255.255.255 as the subnet mask. |
| Default gateway: | Proceed as follows to find out the default gateway. Click again on Start (bottom left button with 4 tiles), then Windows PowerShell and enter ipconfig /all. You will find the default gateway in the Ethernet Adapter Ethernet section. |
Mark the option Use the Following DNS Server Addresses.
| Preferred DNS server: | You can again use ipconfig /all to find this out. You will also find the DNS Server item in the Ethernet Adapter Ethernet section. Select the first of the three servers listed there and enter it as your preferred server |
| Alternative DNS server: | Here you should enter one of the two other DNS servers shown to you in ipconfig /all |
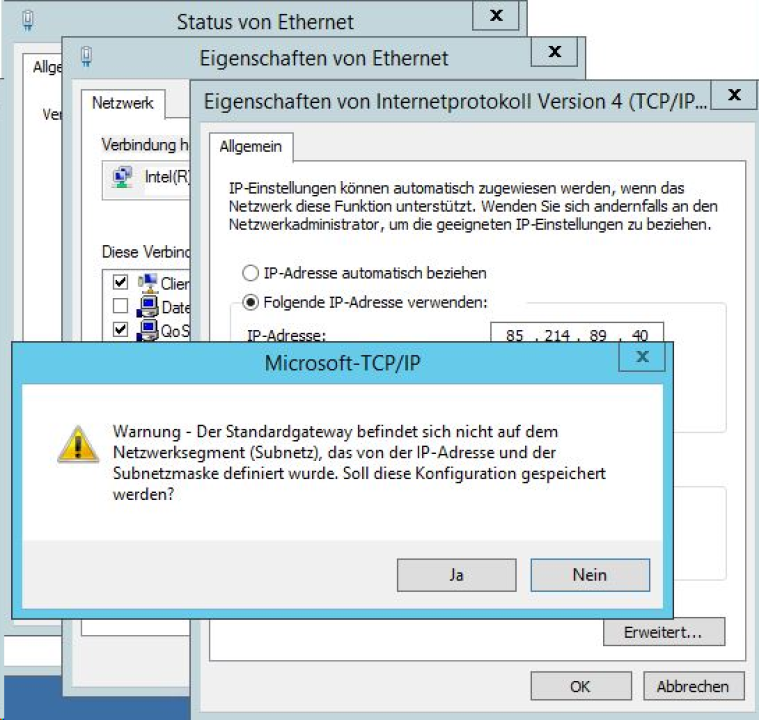
After you have completed your entry with OK, you will receive an alert that the default gateway is not located in the subnet defined by the IP address and subnet mask. Confirm this notification with Yes.
Now restart your server. To do this, there is a default icon on the desktop called Reboot Server.
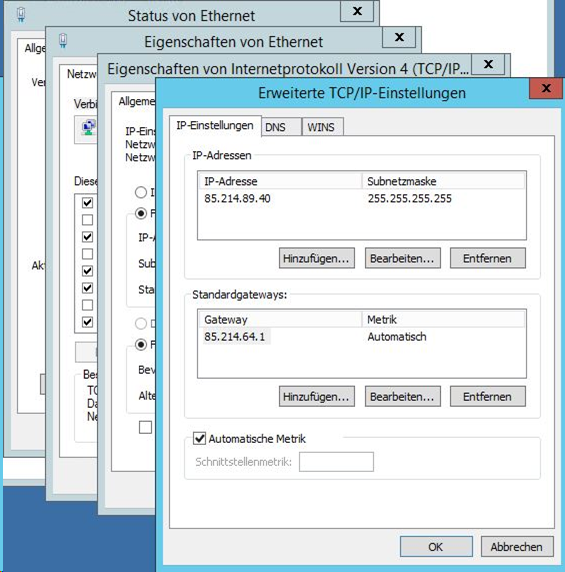
Now open the Internet Protocol Version 4 (TCP/IPv4) window again as described above and click on the Advanced button.
IWhen the window opens, click on the button to Add IP addresses ...
Now enter your secondary IP address and use the subnet 255.255.255.255
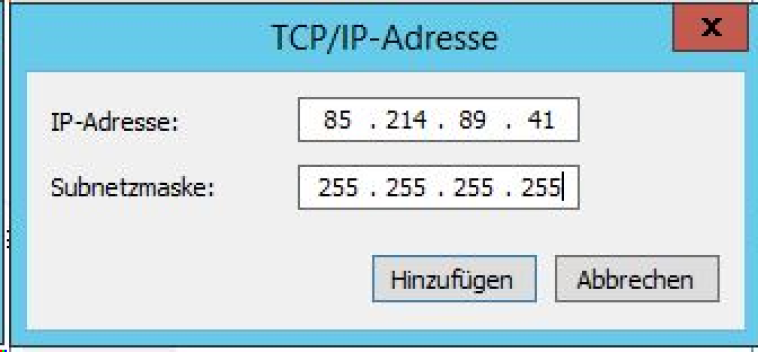
Complete your entry by clicking on Add. The secondary IP address remains active, even when you restart your server.
Setting up the secondary IP address in Plesk
To add the IP address to your server using Plesk, first log into Plesk and then go to Tools & Settings and select IP Addresses under the heading Tools & Resources.

Click on Add IP Address in the overview of your IP addresses

Select the interface on which your primary IP address is also created and enter the secondary IP address from the server login:

Confirming with OK brings you back to the overview of IP addresses. Your IP address is now listed.

The address has already been added to the system
If you have already manually added the IP address to your system or you have one of our Linux V-Servers, you only need to click on Reread IP in the overview of IP addresses.

You can also consult the Plesk Guide.