IPv6 at STRATO
This article gives you some general information about IPv6, how it is set up and used at STRATO.
The Internet Protocol
In order for computers in a network such as the internet to communicate with each other and exchange data, each participating computer must be uniquely addressable.
The internet protocol (IP) is responsible for addressing. If we compare the Internet Protocol with the postal service, the Internet Protocol would define the format of envelopes and determine how postcodes and addresses are formatted and used for delivery.
Participating computers are assigned a unique IP address.
This means that communication with a computer is only possible if its IP address is known. Since the long sequence of numbers is difficult for humans to remember, another service is used to translate IP addresses.
The Domain Name System (DNS) converts the domain name entered in a browser address line into an IP address that computers can read.
Another protocol is used to transport data. In most cases this will be the Transmission Control Protocol, or TCP for short. It ensures the structurally necessary end-to-end connection between the participants.
The Internet Protocol scheme
A computer connected to the network is assigned an IP address according to a defined scheme.
The currently used IPv4 scheme theoretically comprises 4.3 billion (2³²) IP addresses. For historical reasons, almost 15% of them are reserved and are therefore not freely available.
This number is no longer sufficient for the growing number of internet users and internet-enabled devices. It would be possible to mitigate the emerging problem of address scarcity (for example by using NAT on routers), but doing so would undermine the necessary end-to-end connectivity and lead to a proliferation of routing tables.
IANA, the body responsible for allocating IP address blocks, distributed the last free address blocks to the regional registration organisations in January 2011. RIPE NCC (responsible for Europe, Middle East and Central Asia) finally used up its last address block on 25 November 2019. Since then, only the smallest /24 blocks have been allocated according to a waiting list with returned IP addresses.
The IPv6 protocol resolves the scarcity of IP addresses by increasing the address space significantly from 32 to 128 bits. This means that 2^128 or 340 sextillion possible IP addresses (or 667 quadrillion addresses per mm² of the Earth’s surface) are now available.
Notation
IPv4 addresses are formed from four blocks using a decimal system (base 10). The blocks are separated by a dot:
192.67.198.33 (strato.de)
IPv6 addresses are formed from eight blocks using a hexadecimal system (base 16, so including the letters a to f). The blocks are separated by a colon.
Example:
2001:0db8:0000:0000:0209:0000:0000:ec1f
Leading zeros can be omitted. This produces:
2001:db8:0:0:209:0:0:ec1f
Exactly one block of zeros can be replaced by two colons. This shortens the notation to:
2001:db8::209:0:0:ec1f
or:
2001:db8:0:0:209::ec1f
2001:db8::209::ec1f is incorrectly notated, because the block of zeroes has been replaced twice by a colon in this case. The address is therefore no longer unique, as it is unclear how many 0-blocks have been replaced by each ‘::’.
If you enter an IPv6 address in the address line of your browser, you must put it in square brackets. The browser will then recognise that it should transfer only a URL and not a port designation.
Example:
http://[2001:db8::209:0:0:ec1f]
Software, operating systems and browsers
In principle, the vast majority of internet users should have no trouble using IPv4 and IPv6 simultaneously. Nevertheless, an estimated 0.05 to 0.1% of internet users may receive error messages when trying to access content that supports access via both protocol forms.
This is mainly due to incorrect IPv6 configuration in the operating system, outdated browsers and/or routers.
Click on the following link if you want to check whether you can establish an IPv6 connection: https://test-ipv6.com/
Running IPv4 and IPv6 at the same time is called dual stack. Concurrent use of both stacks works in the default configuration of your server. Your IPv4 address will still be assigned to you dynamically, while the IPv6 configuration will be static. You can determine whether IPv4, IPv6 or both address families are used in the configuration for the individual services on your server.
IPv6 has been available without manual installation since Windows XP Service Pack 2. It has even been the preferred connection protocol since Windows Vista. This means that IPv6 only needs to be set up individually for older Windows operating systems.
Mac OS has had native support for IPv6 since Mac OS X 10.3 (Panther). Support can be configured for Mac OS 10.2 (Puma).
Ubuntu has compiled IPv6 support into the kernel since version 10, so there is no need to load a kernel module.
Current versions of mobile operating systems such as Android or iOS also support IPv6 in the basic functions.
The current versions of every modern browser are compatible with the IPv6 protocol.
How do I activate IPv4 and IPv6?
DNS settings
Customers have been able to add an IPv6 address (AAAA record) in the STRATO Customer Login in addition to the IPv4 address (A record).
Betreiben Sie beispielsweise einen eigenen Webserver zum Ausliefern Ihrer Webseiten und ist dieser auch für IPv6 konfiguriert, können Sie die IPv6-Adresse im Menüpunkt Domainverwaltung -> Domain auswählen -> DNS-Einstellungen -> AAAA-Record eintragen.
Linux V-Servers, dedicated Linux and Windows servers (with D or C in the designation)
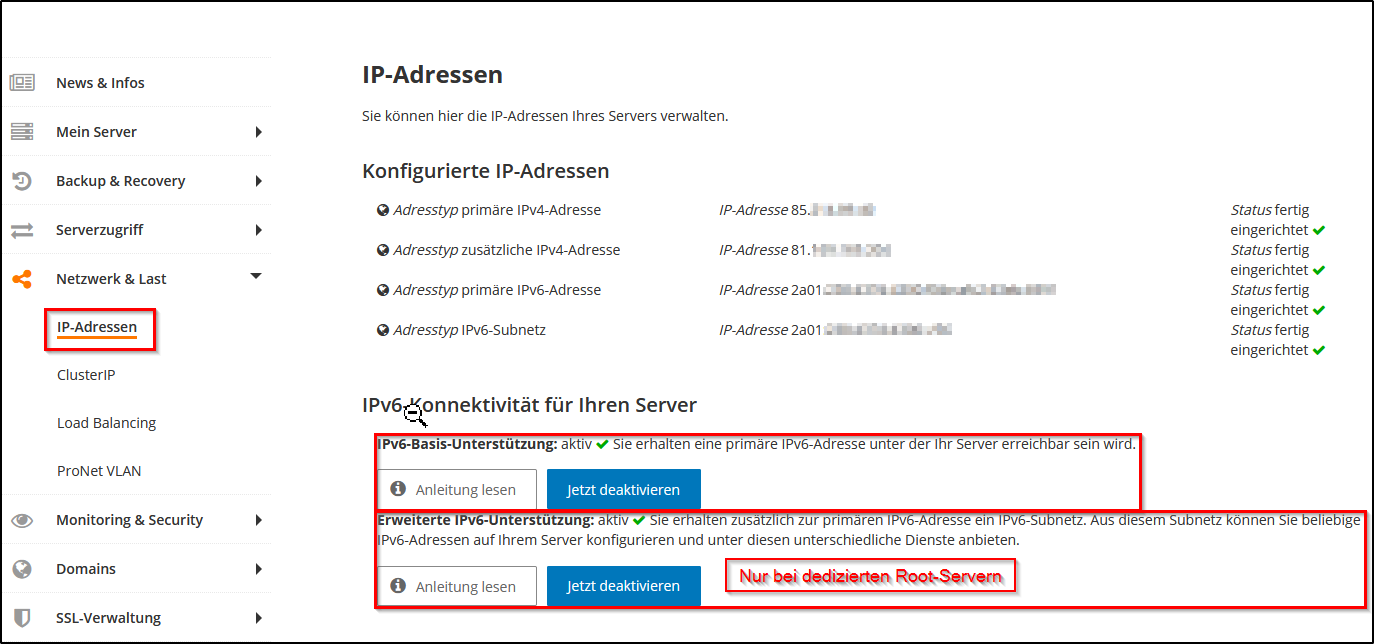
You can set up the IPv6 address in your STRATO Server Login. To do so, access the STRATO Server Login and then select the menu item Netzwerk & Last/ IP-Addressen. You can activate IPv6 support for your server on the following pages.
V-Servers for Windows
You can set up an IPv6 address on your Windows V-Server in the STRATO Server Login by selecting the menu item Mein Server -> VM Übersicht -> Konfigurieren vor.
You will see the IPv6 address once the IPv6 option has been activated. Setup takes a few minutes, so you will initially see the status as Setting up, which changes to Setup complete once it is finished.

Dedicated servers in the CP server class
The procedure for setting up IPv6 for the new dedicated servers is described in Wie kann ich die IP-Adresse beim Root Server (Windows 2016 und 2019 und Linux) bearbeiten?.
Server Cloud
We have published a separate guide for the servers in our Server Cloud, which you can access at Was kann ich mit (öffentlichen) IP-Adressen im Cloud Panel tun?. The setup procedure on the servers is described in detail under Wie füge ich IP-Adressen auf meinen Servern hinzu?.
Managed Server
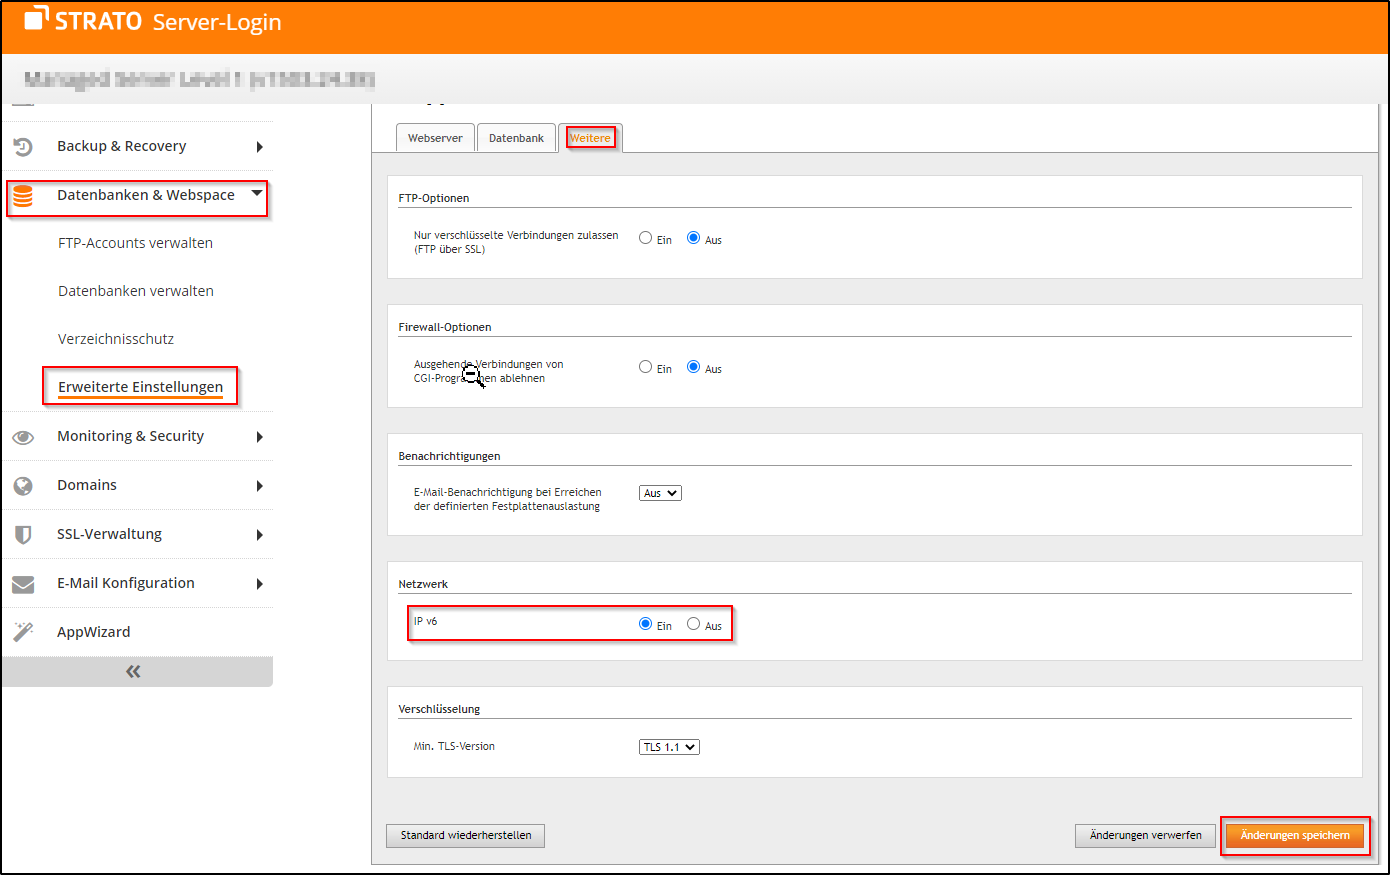
You can set up IPv6 for the managed servers in the server login under Datenbanken & Webspace -> Erweiterte Einstellungen.
Now, click on the Weitere tab, activate the IPv6 option and save the change. The setup is automatic, so there is nothing else you need to do.
How do I set up IPv6 on my server
It is not necessary to set up IP addresses manually on a Linux V-Server. All settings are dealt with by the virtualisation. You only need to restart the server.
It is also not necessary to set up IPv6 manually on a managed server either, as we look after all of these settings as well.
But IPv6 must be set up as an additional IP address for all other servers (Windows V-Servers, Windows and Linux dedicated servers and the Server Cloud). How this configuration is made depends largely on the operating system or the distribution that is used.
For instructions on how to set up IPv6 addresses on the CP Class servers (Windows Server 2016, Windows Server 2019 and Linux as well as the Server Cloud), click here.
It may be necessary to activate Packet Forwarding in the kernel on a dedicated Linux server. For instance, this is the case if a VPN is used directly on the server.
- Temporary activation:
$ sudo echo 1 > /proc/sys/net/ipv6/conf/all/forwarding
If it should also be done for IPv4:$ sudo echo 1 > /proc/sys/net/ipv4/ip_forward
- Permanent activation:
The following lines should be added in the /etc/sysctl.conf file:net.ipv4.ip_forward = 1
net.ipv6.conf.all.forwarding=1
Then activate the configuration:$ sudo sysctl -p /etc/sysctl.conf
Windows Server 2016 and 2019
SSTRATO offers IPv6 connectivity by means of a static network configuration. In order to connect your server to the IPv6-enabled internet, you must configure the primary IPv6 address assigned to you on the primary network interface.
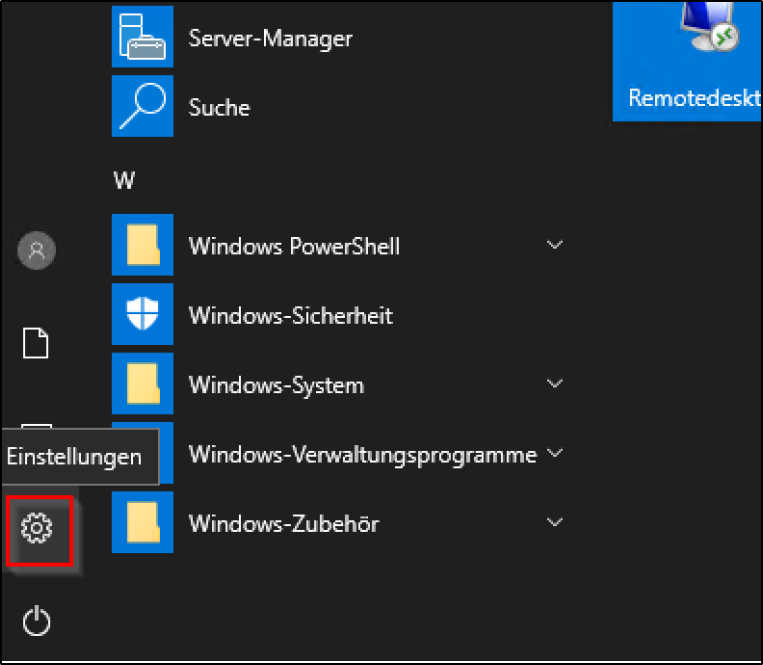
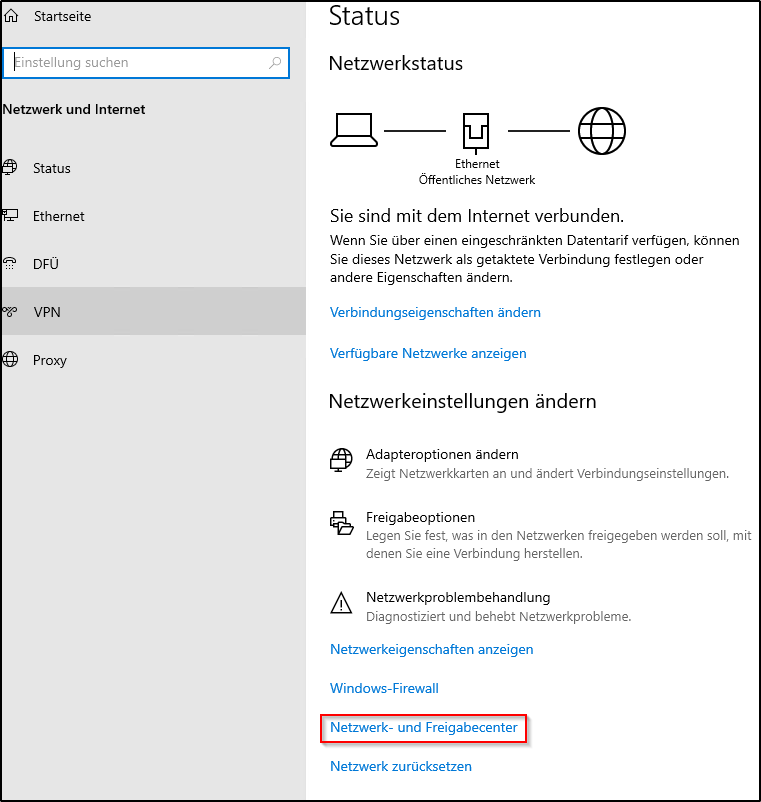
Go to the start menu and select Settings:
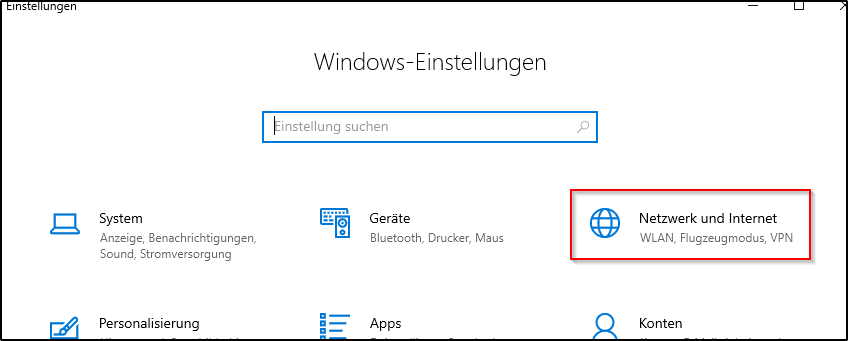
In Settings, select Network & Internet:
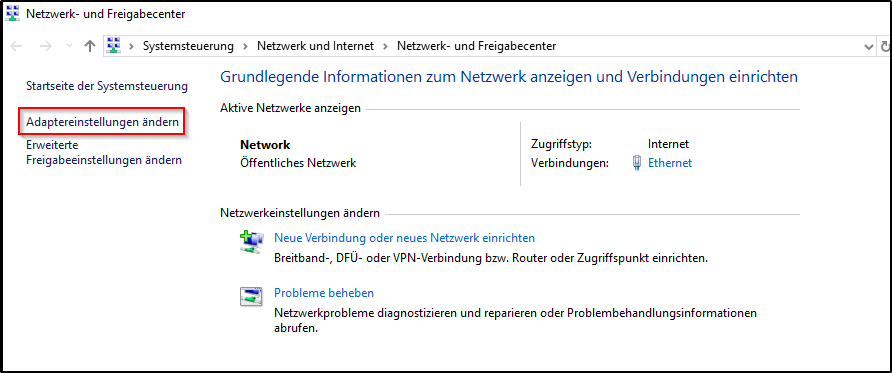
Then go to Network and Sharing Centre:
Select Change Adapter Settings:
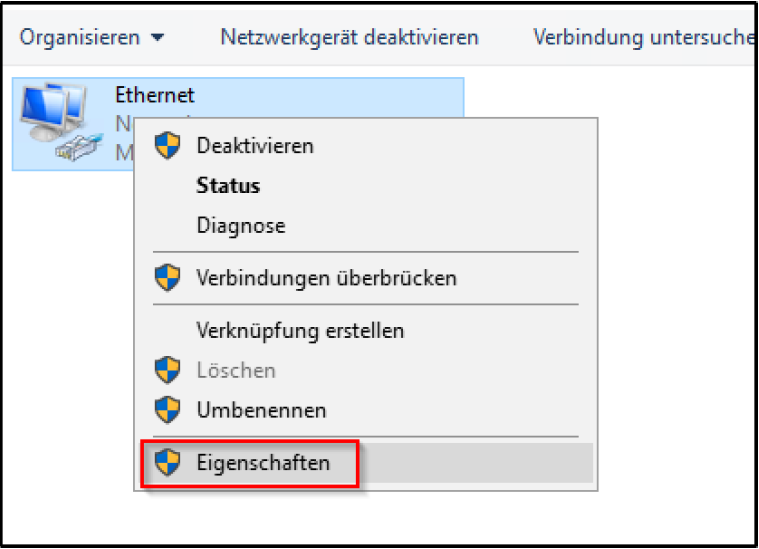
Right-click on Network Adapter and select the menu item Properties:
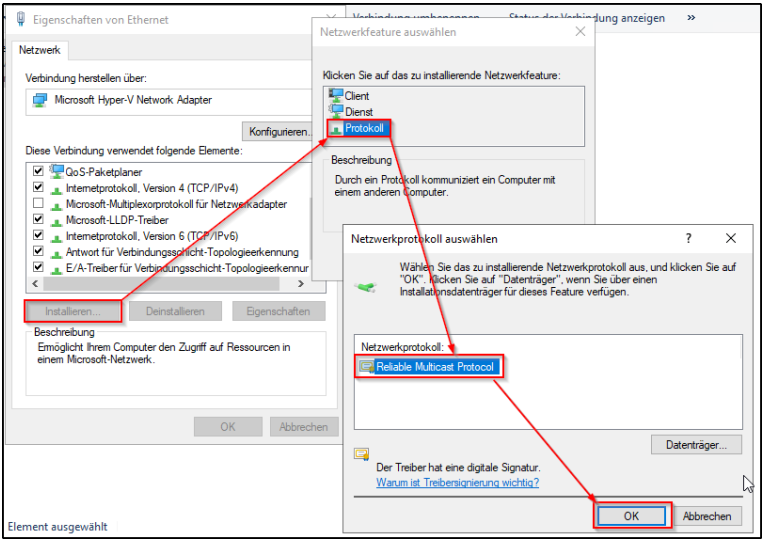
In the Properties window, click Install ..., select the installation of a Protocol and select Reliable Multicast Protocol. Confirm the change with OK and click Close in network feature selection.
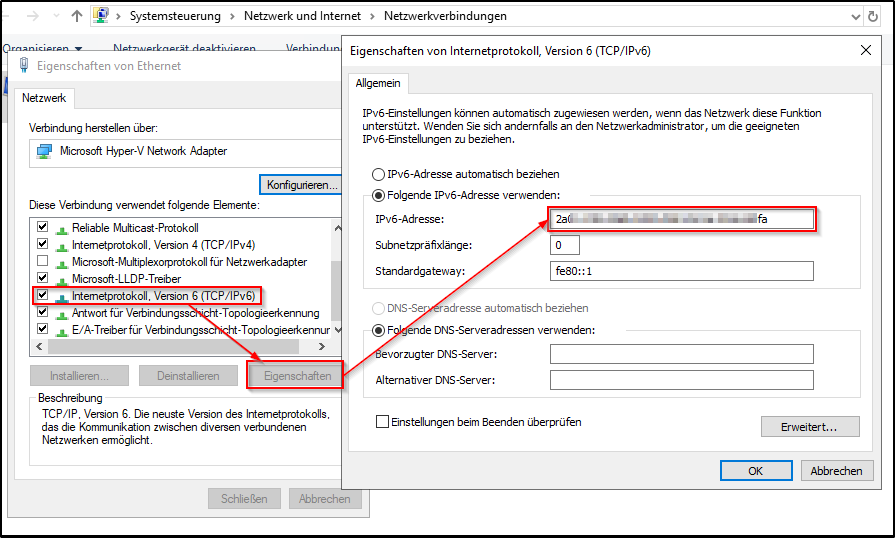
In the Properties window, now select Internet Protocol, Version 6 (TCP/IPv6) and click on Properties. This opens a new window, where you can adjust IPv6 use to Use the Following IPv6 Address. Now you can enter the IPv6 address from the server login.
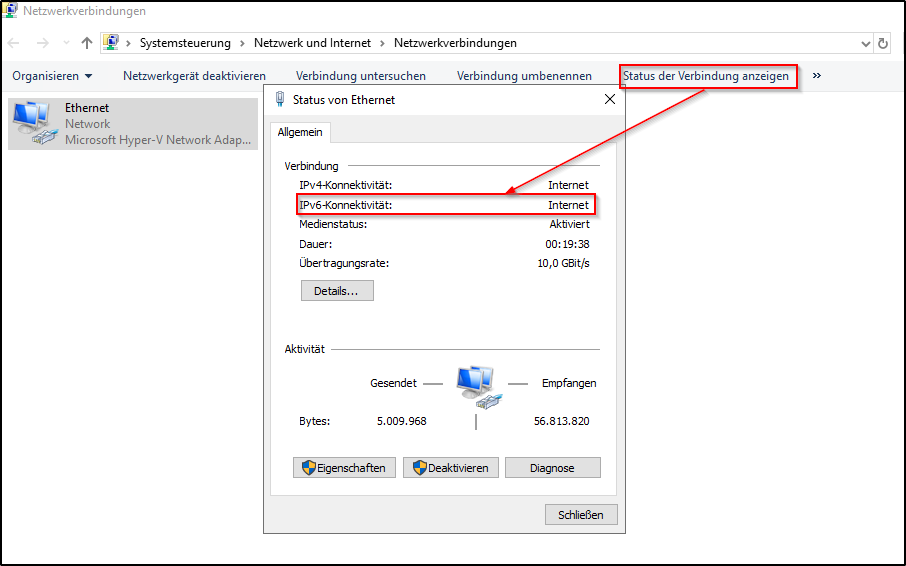
Finally, check the status of the network connections:
CentOS 7 and 8 (network manager)
Network manager is used to configure IPv6 in CentOS 7 and 8. Use the command nmcli in this case
First, check the current configuration and identify which device the connection is assigned and under which name.
# nmcli connection show
NAME            UUID                                   TYPE       DEVICE
Public_ens192   03da7500-xxxx-xxxx-xxxx-xxxxxxxxxxxx   ethernet   ens192
We assume in the following that the Name of the connection is eth0. You must adjust the commands if you are shown a different name.
Now enter the IPv6 and corresponding data::
# nmcli connection modify eth0 ipv6.address <IPv6-Adresse>/64# nmcli connection modify eth0 ipv6.gateway fe80::1# nmcli connection modify eth0 ipv6.method manual
Activate the configuration and reload.# nmcli connection up eth0# nmcli connection reload
Check the settings:# nmcli connection show eth0 | grep ipv6
Finally, to be on the safe side, mark that these settings should be loaded when the system starts:# nmcli connection modify eth0 connection.autoconnect yes
You can try to ping Google via IPv6 to check that it is working:# ping6 -c 5 google.de
Ubuntu 16.04 LTS and Debian up to and including version 11 (networking-service)
Edit the file /etc/network/interfaces
Adjust the section for the network interface eth0 accordingly:# The primary network interfaceauto eth0allow-hotplug eth0iface eth0 inet dhcpiface eth0 inet6 static address <IPv6> netmask 64 gateway fe80::1
Restart network configuration:# systemctl restart networking
Then restart the interface:# ifdown eth0 && ifup eth0
You can try to ping Google via IPv6 to check that it is working:# ping6 -c 5 google.de
Ubuntu 18.04/20.04/22.04/24.04 LTS / Debian from version 12 onwards (netplan)
Since Ubuntu 18.04 LTS and Debian 12, network configuration has been managed using netplan (refer also to our FAQ article on the topic).
Bring up the settings directory for netplan:# ls /etc/netplan/01-netcfg.yaml
Edit the file you find (usually 01-netcfg.yaml):# nano /etc/netplan/01-netcfg.yaml
It should look something like this in its original state.network: version: 2 ethernets: mainif: match: name: '*' dhcp4: yes
Change the range for the following to result:network: version: 2 ethernets: eth0: dhcp4: yes dhcp6: no addresses: - <IPv6-Adresse>/64 gateway6: fe80::1
Now test the configuration:# netplan try
You now have time to check the availability of your server via IPv6 (e.g. using a second concurrent login). Press Enter to confirm the settings if everything is okay. The old settings will be reactivated if you do not confirm.
You can carry out a final test as follows, for example:# ping6 -c 5 google.com
Setup with Plesk
You are unable to add IP addresses manually if you are using one of our Linux V-Servers. Proceed in this case as described under Die Adresse wurde bereits dem System hinzugefügt.
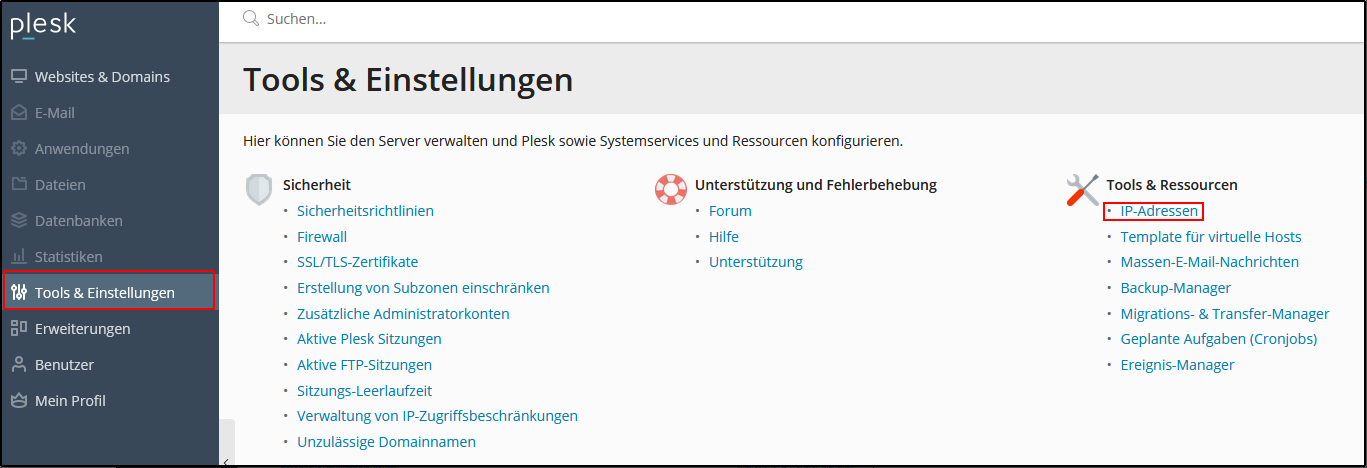
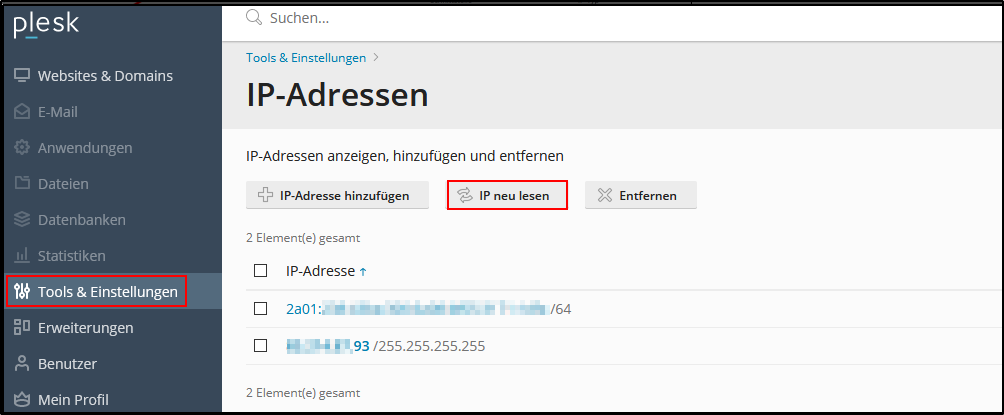
To add the IP address to your server using Plesk, first log into Plesk and then go to Tools & Settings and select IP Addresses under the heading Tools & Resources.
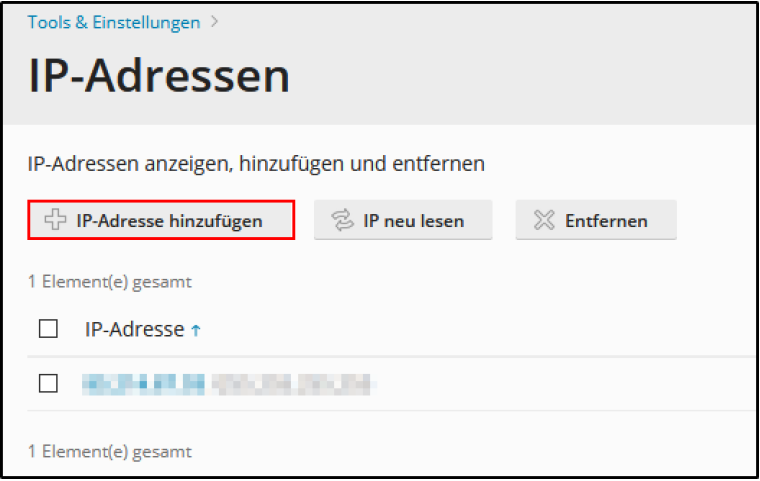
Click on Add IP Address in the overview of your IP addresses.
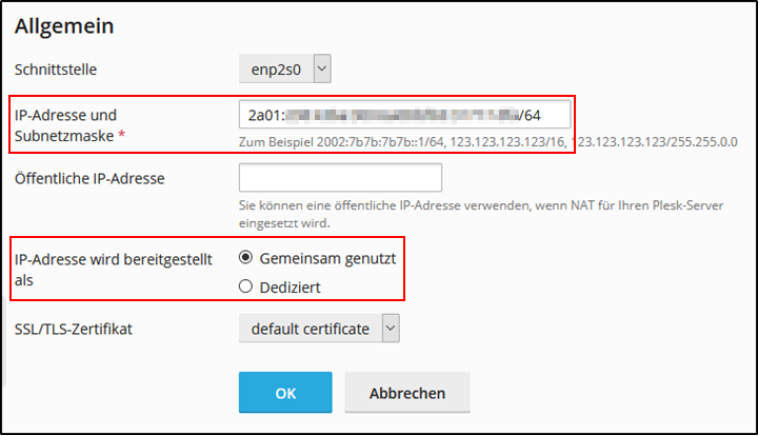
Select the primary interface on which your IPv4 address is also created and enter the IPv6 address from the server login:
Confirming with OK brings you back to the overview of IP addresses. Your IPv6 should now be listed here.
If you have already manually added the IPv6 address to your system or you have one of our Linux V-Servers, you only need to click on Reread IP in the overview of IP addresses.
You can also consult the Plesk Guide.
How do I use individual addresses from my IPv6 subnet?
Preparing to use the subnet
If you have activated an IPv6 subnet (for our dedicated servers), there is still something you need to prepare on a Linux server before you can use additional addresses from your IPv6 subnet. Set up a route that prevents packages that are sent to unused address ranges from being transferred back and forth between your server and router. Our security system would classify this network traffic as a DoS attack and therefore block it. A description of how this is done is found at the bottom for each operating system..
CentOS 7 and 8
Network manager is used to configure IPv6 in CentOS 7 and 8. We use the command nmcli in this case.
First we check the current configuration and identify to which device the connection is assigned and under which name.# nmcli connection showNAME UUID TYPE DEVICEPublic_ens192 03da7500-xxxx-xxxx-xxxx-xxxxxxxxxxxx ethernet ens192
We assume in the following that the Name of the connection is eth0. You must adjust the commands if you are shown a different name.
he first step is to prepare the subnet.
yum install network-scripts and then restart the server.
Edit the file /etc/sysconfig/network-scripts/ifcfg-lo by adding the following line at the end:IPV6INIT=yes
Create the file /etc/sysconfig/network-scripts/route6-lo with the following content:<IPv6-Subnetz> dev lo
Then restart the loopback interface# ifdown lo# ifup lo
Enter the IPv6 and corresponding data:# nmcli connection modify eth0 ipv6.address <primäre IPv6-Adresse>/64# nmcli connection modify eth0 ipv6.gateway fe80::1# nmcli connection modify eth0 ipv6.method manual
Add additional IPv6 addresses from your subnet:# nmcli connection modify eth0 +ipv6.addresses <IPv6 Adresse>/56
Activate the configuration and reload.# nmcli connection up eth0# nmcli connection reload
Next check the settings:# nmcli connection show eth0 | grep ipv6
Finally, to be on the safe side, mark that these settings should be loaded when the system starts:# nmcli connection modify eth0 connection.autoconnect yes
You can try to ping Google via IPv6 to check that it is working:# ping -6 -c 5 google.de
A complete model set-up would look like this, for example:/etc/sysconfig/network-scripts/ifcfg-lo:DEVICE=loIPADDR=127.0.0.1NETMASK=255.0.0.0NETWORK=127.0.0.0# If you're having problems with gated making 127.0.0.0/8 a martian,# you can change this to something else (255.255.255.255, for example)BROADCAST=127.255.255.255ONBOOT=yesNAME=loopbackIPV6INIT=yes/etc/sysconfig/network-scripts/route6-lo:2a01:238:xxxx:xxxx::/56 dev lo# ifdown lo# ifup lo# nmcli connection modify eth0 ipv6.address 2a01:238:xxxx:xxxx:xxxx:xxxx:xxxx:1dfa/64# nmcli connection modify eth0 ipv6.gateway fe80::1# nmcli connection modify eth0 ipv6.method manual# nmcli connection modify eth0 +ipv6.addresses 2a01:238:xxxx:xxxx::5/56# nmcli connection modify eth0 +ipv6.addresses 2a01:238:xxxx:xxxx::10/56# nmcli connection up eth0# nmcli connection reload
Tip: ‘connection’ can also be abbreviated, e.g. to ‘conn’.
Ubuntu 16.04 LTS and Debian
Make additions to the file /etc/network/interfaces according to the following scheme:auto loiface lo inet loopbackpre-up modprobe ipv6post-up ip -6 route add <IPv6-Subnetz>/56 dev lopre-down ip -6 route del <IPv6-Subnetz>/56 dev lo# The primary network interfaceauto eth0allow-hotplug eth0iface eth0 inet dhcpiface eth0 inet6 static address <primäre IPv6-Adresse> netmask 64 gateway fe80::1 up ip addr add <IPv6-Adresse aus dem Subnetz>/56 dev eth0 down ip addr del <IPv6-Adresse aus dem Subnetz>/56 dev eth0
Restart network configuration:# systemctl restart networking
Then restart the interfaces as well:# ifdown eth0 && ifup eth0# ifdown lo && ifup lo
You can now also display the IP addresses:# ip addr
Ubuntu 18.04 LTS
Bring up the settings directory for netplan:# ls /etc/netplan/01-netcfg.yaml
Edit the file you find (usually 01-netcfg.yaml):# nano /etc/netplan/01-netcfg.yaml
You can change all the settings in this file, so change the file /etc/netplan/01-netcfg.yaml according to the following scheme:network: version: 2 renderer: networkd ethernets: lo: match: name: lo addresses: - 127.0.0.1/24 routing-policy: - from: <IPv6-Subnetz>/56 eth0: dhcp4: yes dhcp6: no addresses: - <IPv6-Adresse>/64 - <IPv6-Adresse aus dem Subnetz>/56 - .... gateway6: fe80::1
Now test the configuration:# netplan try
You now have time to check the availability of your server via IPv6. Press Enter to confirm the settings if everything is okay. The old settings will be reactivated if you do not confirm.
You can carry out a final test as follows, for example:# ping6 -c 5 google.de
Ubuntu 20.04 LTS
Bring up the settings directory for netplan:# ls /etc/netplan/01-netcfg.yaml
Edit the file you find (usually 01-netcfg.yaml):# nano /etc/netplan/01-netcfg.yaml
You can change all the settings in this file, so change the file /etc/netplan/01-netcfg.yaml according to the following scheme:network:
version: 2
renderer: networkd
ethernets:
lo:
match:
name: lo
addresses:
- 127.0.0.1/24
routing-policy:
- from: <IPv6 subnet>/56
enp0s2:
dhcp4: yes
dhcp6: no
addresses:
- <IPv6 address>/64
- <IPv6 address from the subnet>/56
- ....
gateway6: fe80::1
Now test the configuration:# netplan try
SYou now have time to check the availability of your server via IPv6. Press Enter to confirm the settings if everything is okay. The old settings will be reactivated if you do not confirm.
You can carry out a final test as follows, for example:# ping6 -c 5 google.com
Setup with Plesk
We recommend setting up IPv6 and the subnet addresses manually as described above for the relevant distribution. Then have Plesk to import the settings again under Tools & Settings > IP Addresses.

