Which DNS records are available at STRATO and how can I manage them?
Domain Name System (DNS for short) entries can be configured and managed at STRATO. In this article we inform you about the possibilities of the entries and how you can manage them.
Please note that it can take up to 24 hours for the DNS changes to become fully active.
Please understand that we cannot assume any responsibility for disruptions due to incorrect name server settings. Therefore, only make changes to these settings if you are absolutely sure of your steps.
Which DNS entries can be set at STRATO?
The following DNS entries can be created or changed in the DNS settings of the selected domains or subdomains:
| DNS Setting | Definition | Domain | Subdomain |
| NS-Record | Forwarding name server requests to another name server | x | x |
| A-Record | Linking your domain to a specific IP address (for example, the IP address of your server) | x | x |
| AAAA-Record | Linking your domain to a specific IPv6 address of your server | x | x |
| MX-Record | Enter a host name as the responsible mail server with a specific priority | x | x |
| TXT-Record inkl. SPF & DKIM | Allows you to store any text in the DNS zone | x | x |
| SRV-Record | You can use the Service Resource Record (SRV) to determine which services are offered under your domain/subdomain | x | x |
| CNAME Record | For subdomains, you can change the CNAME record and thus enter an alias for a web server | x | |
| Dynamic DNS | Make your computers accessible via your own domain. Please remember that the DynDNS is not available in every package. DynDNS is included starting with the PowerWeb Basic package (2013) and STRATO Domain and BasicWeb XL (for existing customers). An instruction manual for this can be found here. | x | x |
Where can I configure the DNS entries?
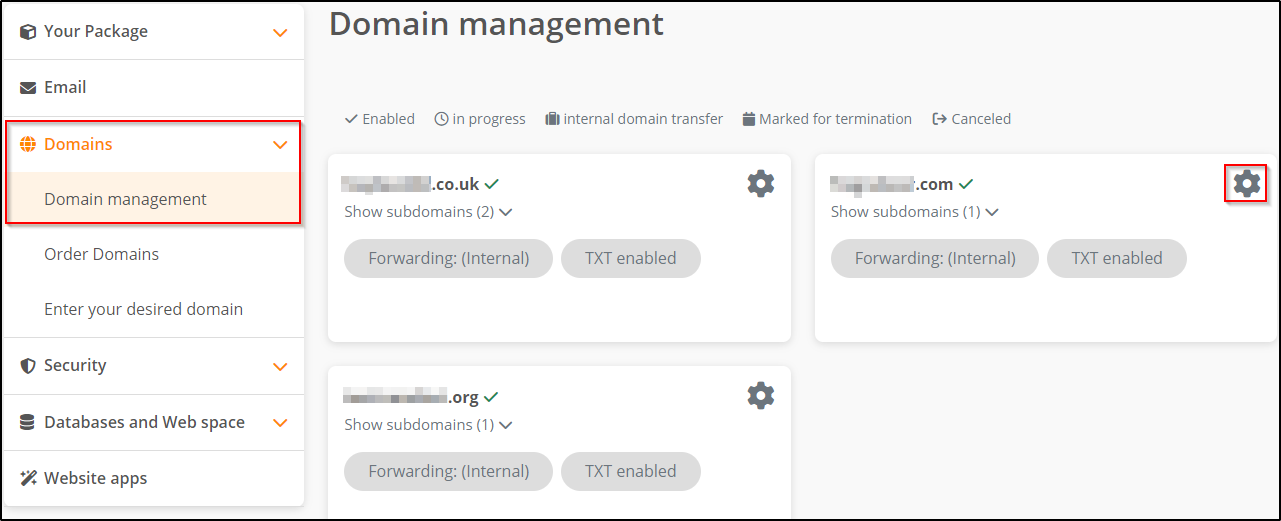
You can make the DNS setting with just a few clicks in your STRATO customer login. After logging in, go to the menu items Domains → Domain management.
In the domain overview, select the cogwheel next to the respective domain.
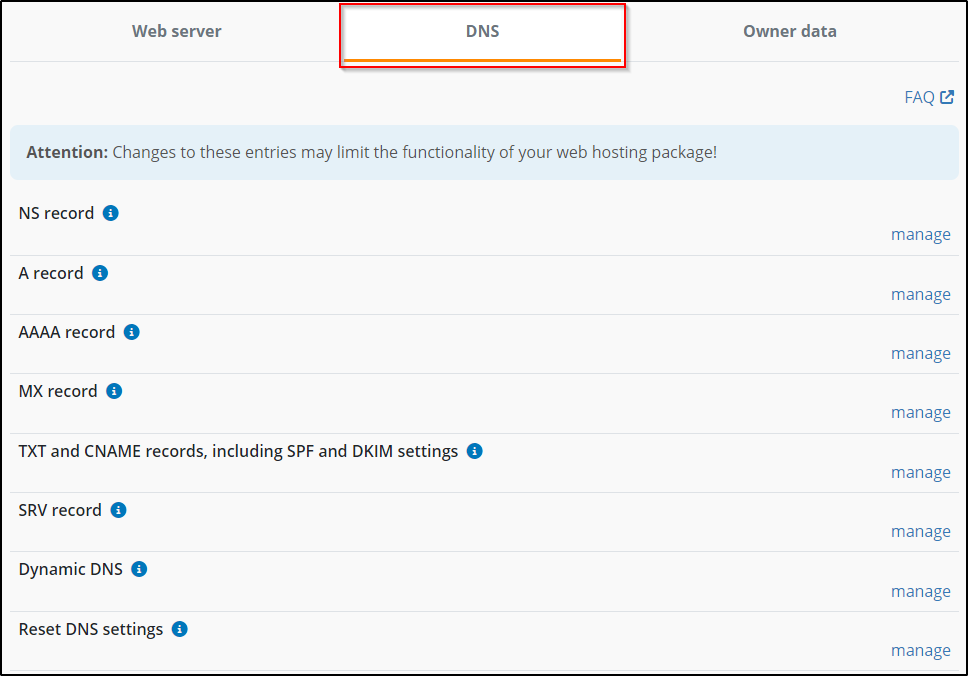
On the following page, you can click on the DNS tab and then enter the desired DNS record.
How can I configure the NS record (name server)?
You can edit the name server record (NS record) for your domains and subdomains (with the exception of .es, .fr and .be domains) and thus specify which name server is responsible for your domain or subdomain.
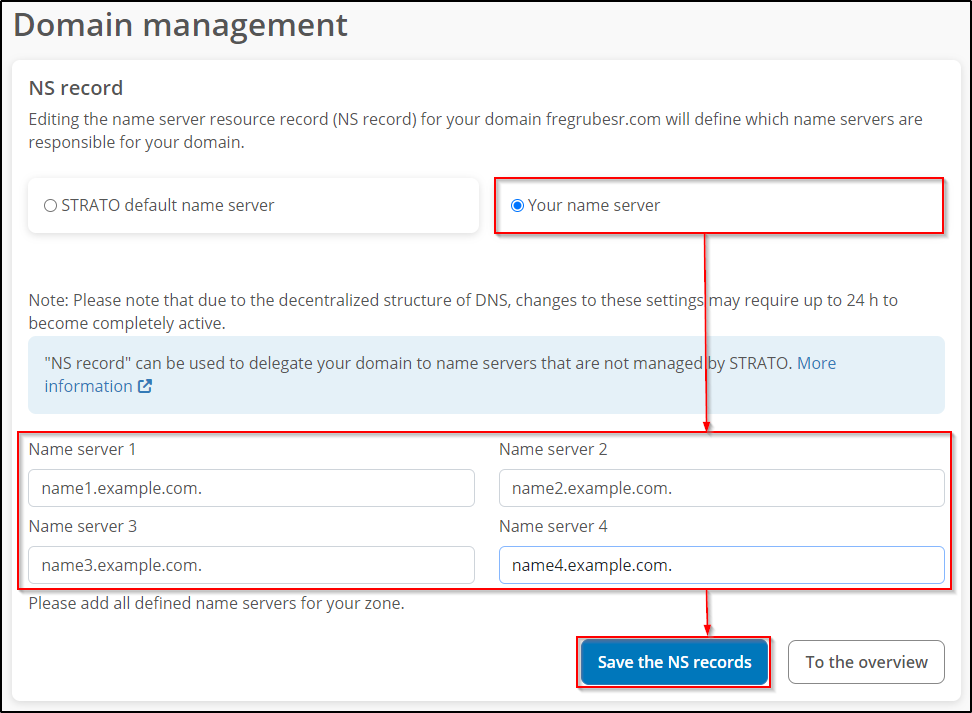
The STRATO standard name server is preset. However, you can also enter up to four of your own name servers for your domain or subdomain. The first address is that of the primary name server.
You can make the DNS setting in the customer login. After logging in, select the menu items Domains → Domain administration.
In the domain overview, select the cogwheel next to the respective domain.
On the following page, you can click on the DNS tab and then manage the NS record.
Now activate Own name servers and enter your own name servers. The format for name servers is name1.example.com. Save the settings with the Save NS record button.
If you have set an NS record but continue to use our shared hosting mail services by pointing the MX record to STRATO, other DNS entries, such as DKIM, must be maintained on the DNS server or by yourself.
MX-Record: smtpin.rzone.de
SPF: v=spf1 redirect=_spf.strato.com
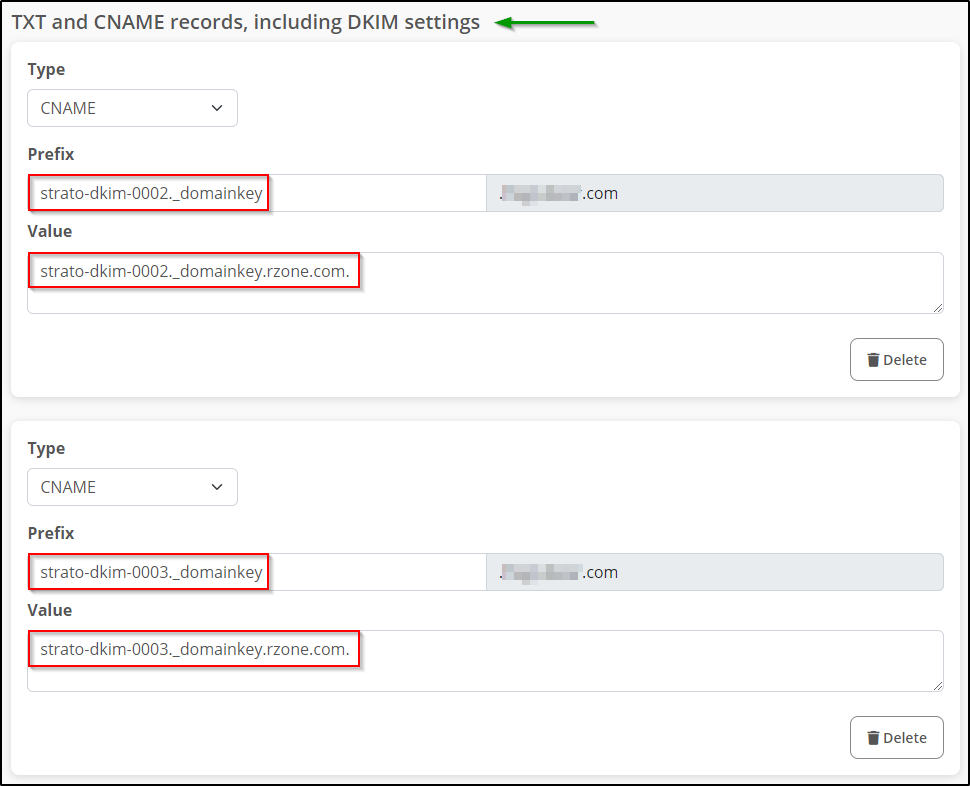
You can enter the following two CNAME records for the current DKIM selectors:strato-dkim-0002._domainkey.mydomain.tld CNAME strato-dkim-0002._domainkey.rzone.com.strato-dkim-0003._domainkey.mydomain.tld CNAME strato-dkim-0003._domainkey.rzone.com.
Please note that we may carry out key rollovers to new selectors at certain intervals.
Therefore, please check the use of the selector regularly and check back here.
How can I configure the secondary NS record? (Server)
With a secondary nameserver, you can create a backup in case the primary nameserver fails. This allows you to ensure that the domain can still be reached. Primary and secondary name servers run redundantly (all configurations relating to the domain are synchronised by the zone transfer), so that the second name server can output the correct DNS records for the domain, such as A record, MX record, etc., if the first one fails.
When using STRATO Secondary Nameserver, a separate nameserver is sufficient. If you allow a zone transfer from your primary name server to sns.serverkompetenz.de, it will receive the DNS configurations of the domains you have set up on your primary name server.
Please also note that you must enter the IP of the primary name server in the Master IP input field below.
If the primary name server fails, the domains are still accessible.
In the zone of the domain, sns.serverkompetenz.de must also be listed as a name server in the NS set.
How can I configure the A-record?
You can use an A-Record to redirect your domain to a fixed IP address (e.g. that of your own server). Settings for the A-Record are also possible for subdomains.
You can make the DNS setting in the customer login. After logging in, select the menu items Domains → Domain management.
In the domain overview, select the cogwheel next to the respective domain.
On the following page, you can click on the DNS tab and then manage the A-Record.
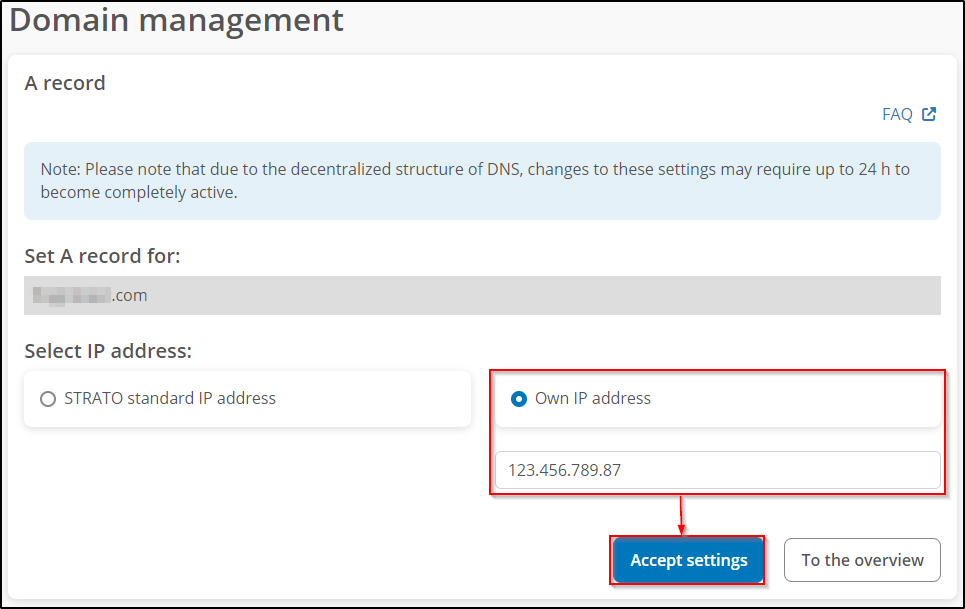
Set the radio button to Own IP address, enter your IP address and save by clicking on Accept settings.
How can I configure the AAAA record?
With an AAAA record, you can redirect your domain to a fixed IPv6 address (e.g. that of your own server). Settings for the AAAA record are also possible for subdomains.
You can make the DNS setting in the customer login. After logging in, select the menu items Domains → Domain management.
In the domain overview, select the cogwheel next to the respective domain.
On the following page, you can click on the DNS tab and then manage the AAAA record.
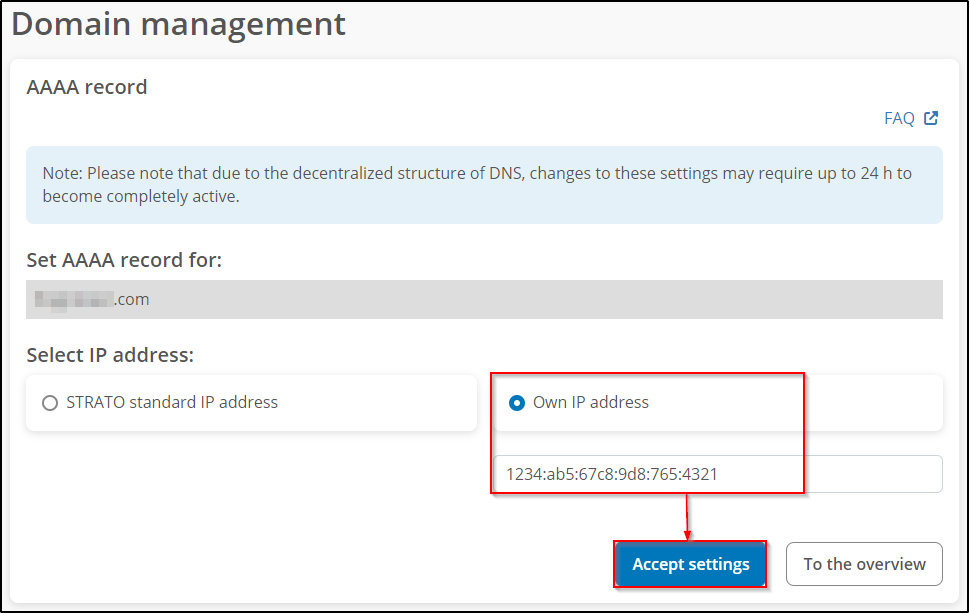
Click on Own IP address and enter the respective address components in the corresponding fields. Click Accept settings to save the entry.
How can I configure the MX record?
You can use the Mail Exchange Resource Record (MX record) to define which mail servers are responsible for your domain. A distinction is made between Primary mail server and Backup mail server. If the primary email servers are not available, the emails are temporarily stored on the servers that are stored as backup email servers.
By configuring your own mail server, it assumes complete responsibility for accepting, filtering and forwarding emails. The STRATO mail system will then no longer store, filter or forward emails, even if mailboxes or forwarders are still set up.
All existing mailboxes and emails at the time of setting up your own mail server (MX record) are retained and can still be read.
You can change the MX record separately for each domain as well as for each subdomain.
You can make the DNS setting in the customer login. After logging in, select the menu items Domains → Domain management.
In the domain overview, select the cogwheel next to the respective domain.
On the following page, you can click on the DNS tab and then manage the MX record.
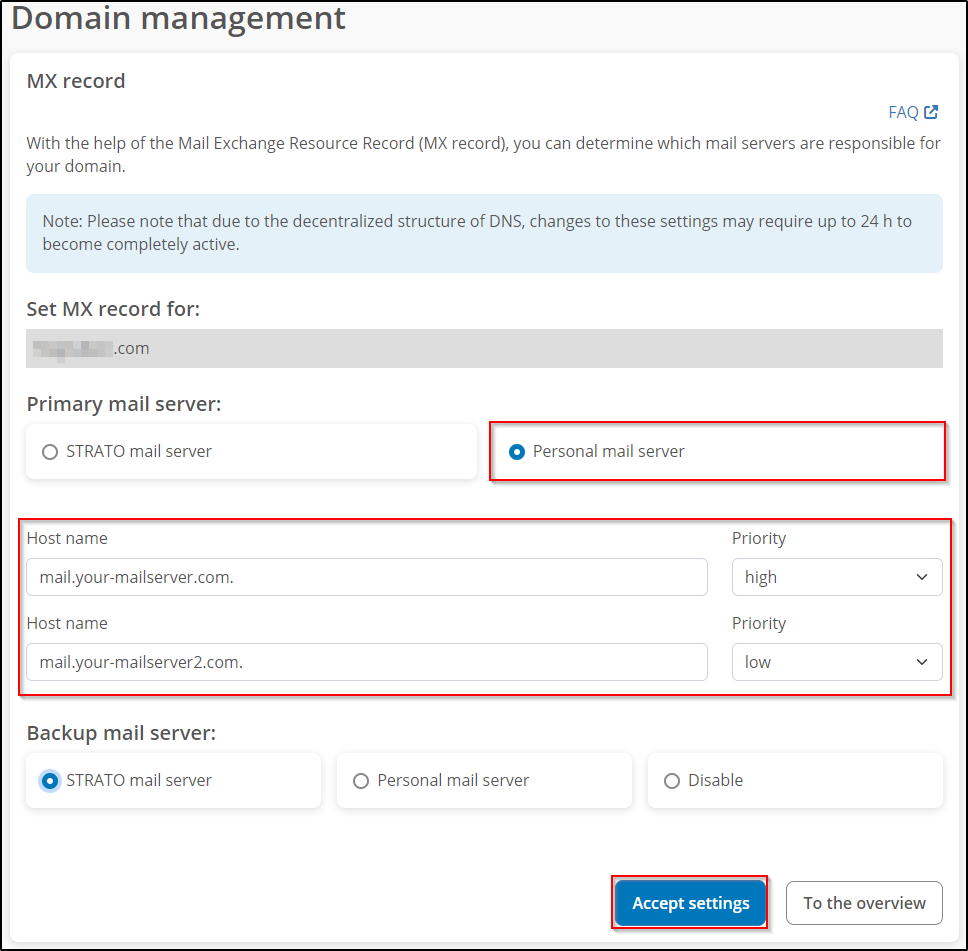
You can now switch to Personal mail server and enter your own e-mail server or that of another IT service provider and save it by clicking on Accept settings.
In addition to the primary mail servers, you can also define backup mail servers, which are used if the primary mail server is unavailable.
A drop-down menu is available to the right of your address field, which you can use to prioritise your email accounts. Please note that the primary mail server always has a higher priority than the backup server.
What happens if the (primary) mail servers are unavailable?
1. If you have set up two primary mail servers, STRATO attempts to deliver the emails first to the first and then to the second mail server. If this is not possible, an attempt will be made to deliver the e-mail to the first backup mail server.
2. If the STRATO mail server is used as a backup, the emails remain there for a maximum of 5 days. During these 5 days, the STRATO backup mail server repeatedly tries to reach one of the primary mail servers and deliver the message to it. If the primary mail servers are unavailable for a maximum of five days, the messages are returned to the sender as undeliverable.
3. If you use your own primary and backup server, STRATO cannot do anything to restrict them. Whether the sender is informed that the mail has not been delivered depends on the configuration of the mail server.
How can I configure the TXT record (incl. SPF)?
You can use the TXT record to store a freely definable text in the DNS zone. You can use the TXT record to make settings for the SPF record, for example.
You can make the DNS setting in the customer login. After logging in, select the menu items Domains → Domain management.
In the domain overview, select the cogwheel next to the respective domain.
On the following page, you can click on the DNS tab and then manage the TXT and CNAME records, including SPF and DKIM settings.
On the following page, you can specify the TXT record for the selected domain.
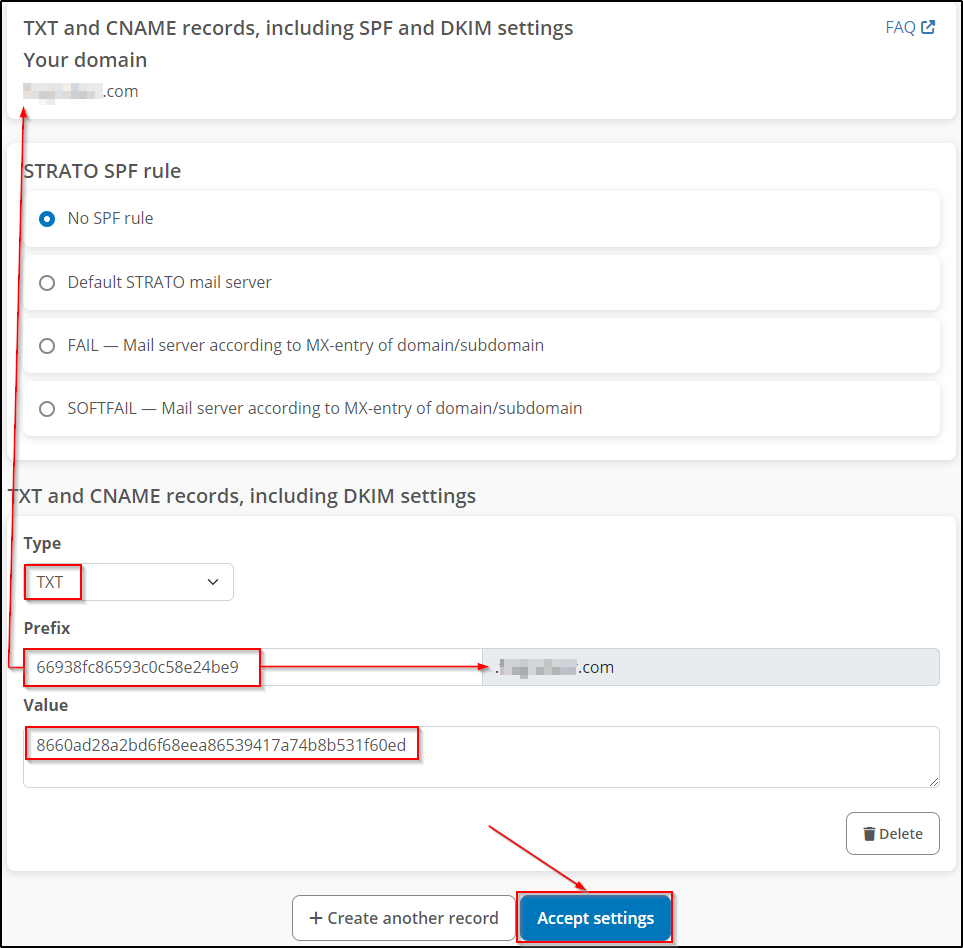
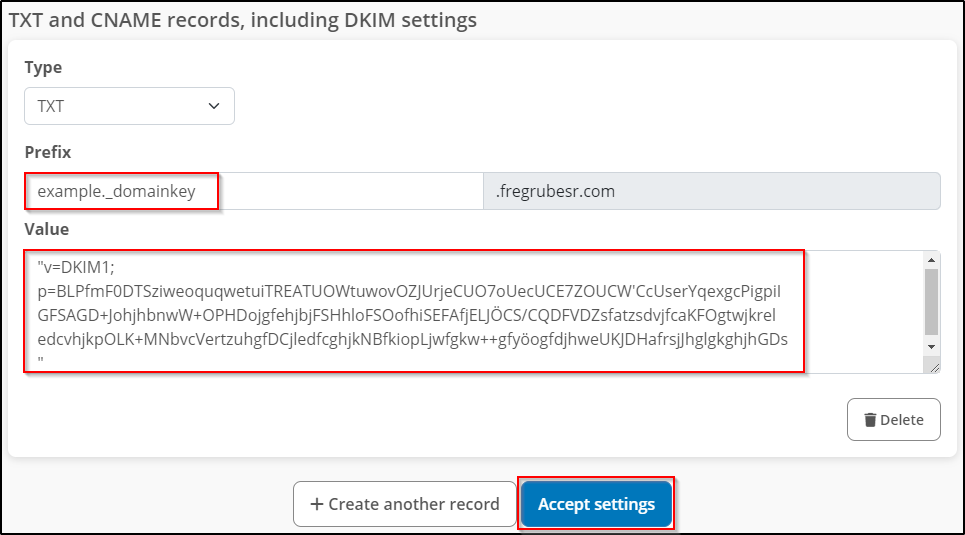
Please note that the Type has to be "TXT" and the domain name is automatically added to the value entered for Prefix.
For example, if you want to add a TXT record with the following values:
Hostname:
66938fc86593c0c58e24be9.domain.com
and a target with the key:
8660ad28a2bd6f68eea86539417a74b8b531f60ed
then only the first part of the host name is entered as the Prefix and the key is entered in the corresponding Value text field:
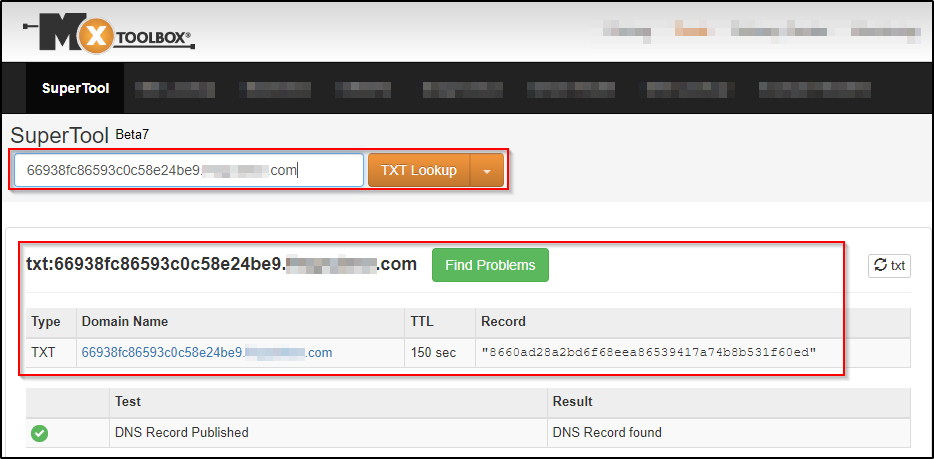
You can then check whether the TXT entry has been created correctly, for example on the MXToolbox website:
SPF
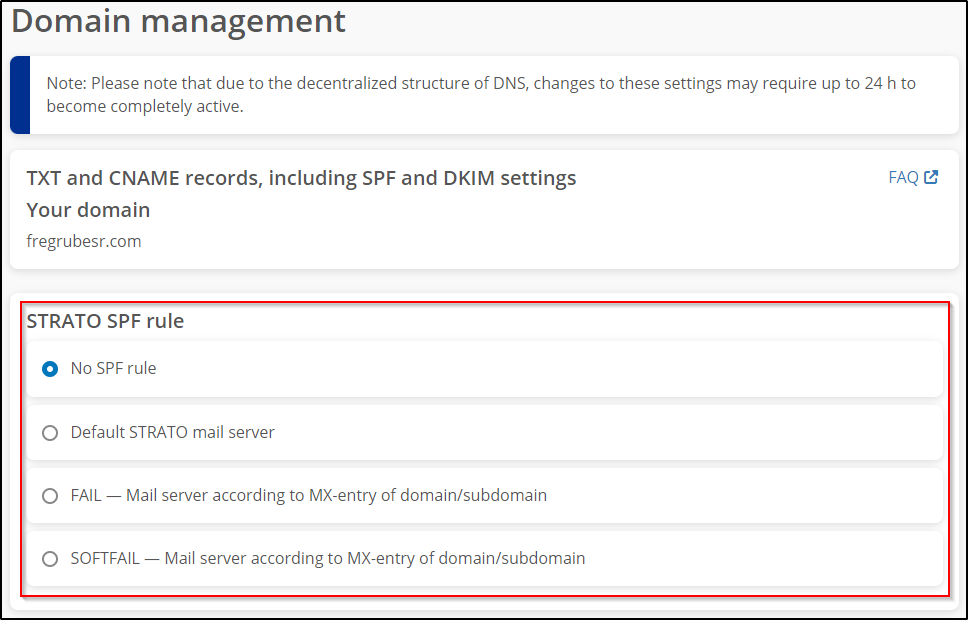
You can choose whether you want to use one of the predefined SPF rules or alternatively define a customised TXT rule.
Overview of the predefined SPF rules
| SPF rule | Explanation |
| Default STRATO mail server | In most cases, it is sufficient to set the setting to “No STRATO SPF rule” or leave it as it is. |
| Fail | the directive defines unauthorised senders, recommended setting when using an alternative use of an alternative e-mail server (own MX record) |
| Softfail | The directive also defines unauthorised transmitters, but treats them less restrictively. less restrictive, is mostly used for testing purposes |
| Prefix | specifies where the rule should be applied, whether to specific domains or to all domains |
| Value | Code which is to be executed |
How can I configure the DKIM?
DKIM is a method of defence against spam and phishing emails. With this method, the email is automatically provided with a digital signature by the sending mail server. The receiving mail server can then verify the email by querying the public key in the DNS of the sender domain.
For customers who only use our mail servers (send via "smtp.strato.com"), we have been signing all outgoing emails with DKIM for years.
You can make the DNS setting in the customer login. After logging in, select the menu items Domains → Domain management.
In the domain overview, select the cogwheel next to the respective domain.
On the following page, you can click on the DNS tab and then manage the TXT and CNAME records, including SPF and DKIM settings.
You can make the DKIM settings here.
How can I configure the SRV record?
You can use the Service Resource Record (SRV) to define which services are offered under your domain/subdomain. SRV records are often used for the XMPP, SIP or LDAP protocols and for using Microsoft 365.
You can make the DNS setting in the customer login. After logging in, select the menu items Domains → Domain management.
In the domain overview, select the cogwheel next to the respective domain.
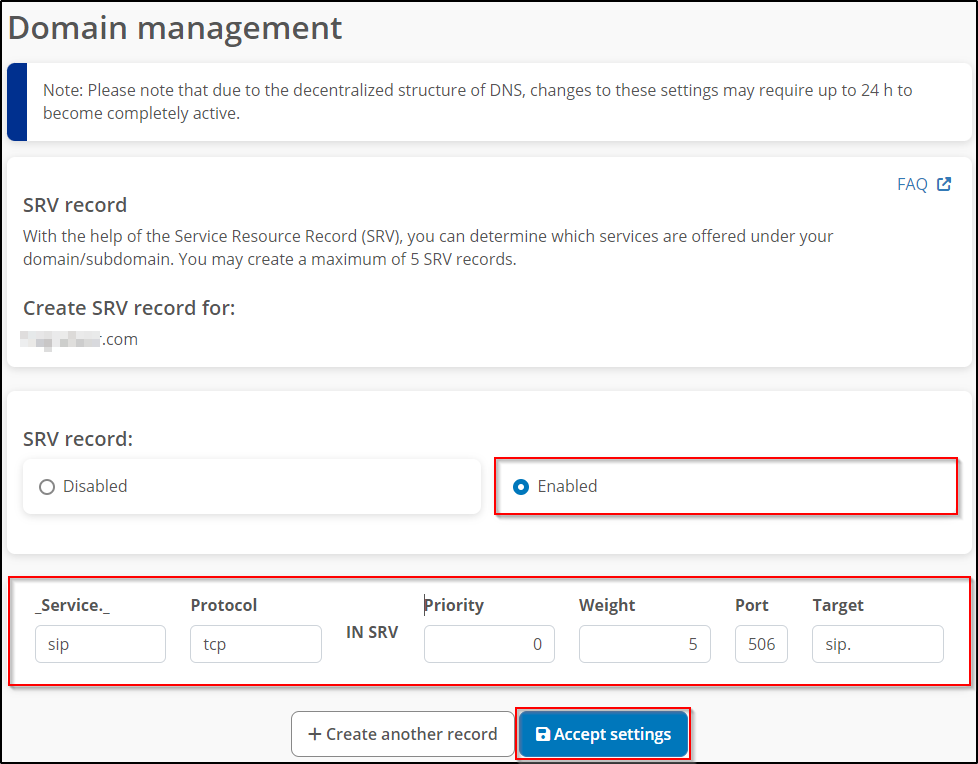
On the following page, you can click on the DNS tab and then manage the SRV record.
| Input field | Content | Notes |
| _Service._ | Enter the name of the propagated service, e.g. sip Note: the special characters "_ . _" do not have to be entered be entered | Restrictions: Permitted Number of characters = min. 1 to max. 24. Permitted characters = Letters a-z and A -Z, no umlauts, digits 0-9, special characters "-" |
| Protocol | Enter the desired protocol here protocol, e.g. tcp | Restrictions: Allowed characters = letters a-z and A -Z, no umlauts, digits 0-9 |
| Priority | Entries with low priority are treated preferentially | Restrictions: Allowed characters characters = digits 0-9 Range = 0-65535 |
| Weight | The weight serves to load distribution with the same priority | Restrictions: Allowed characters characters = digits 0-9 Range = 0-65535 |
| Port | Enter the port number here | Restrictions: Permitted Number of characters = min. 1 to max. 5 Permitted characters = digits 0-9 Range = 0-65535 |
| Target | Enter the host name of the server server that provides the service, e.g. sip.wunschname.de | Restrictions: Allowed characters characters = letters a-z and A -Z, no umlauts, digits 0-9, special characters ".", "-" |
An absolute name server must be specified, i.e. the server name must end with a dot after the top-level domain. Please note that the target must have a valid A or AAAA record; a target with a CNAME record is not permitted.
How can I configure the CNAME record?
STRATO offers you the option of changing the CNAME entry for the subdomains you have set up. You can use this change to forward your subdomain to any other address and thus make external applications accessible under your domain. This service is required, for example, to use your domain with Microsoft Online Services or Google Apps.
Instead of mail.google.com/a/desiredname.com, you can also access the offer via mail.desiredname.com, for example.
You can make the DNS setting in the customer login. After logging in, select the menu items Domains → Domain management.
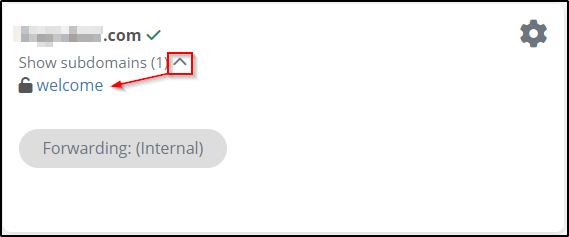
In the domain overview, you will find "Show subdomains (x)" under your domain. Click on the arrow next to it to expand the list. Then click on the subdomain.
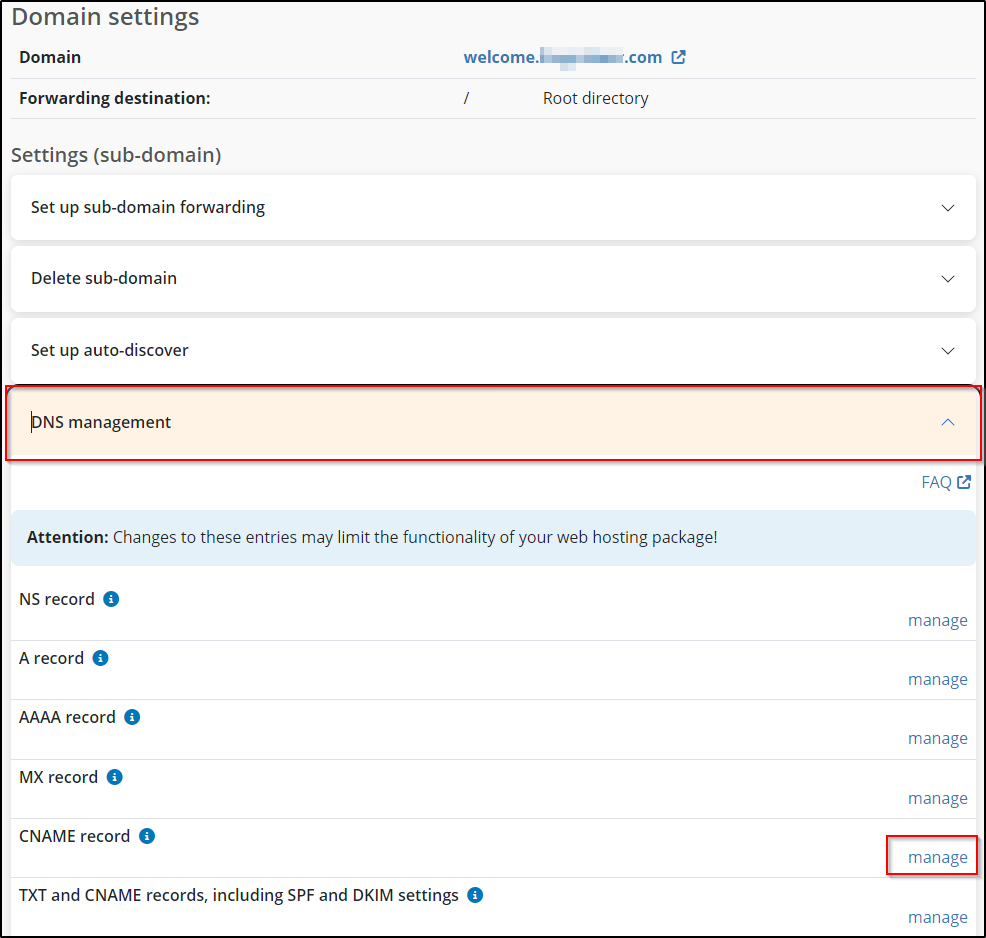
You can now open the DNS management and click on manage next to CNAME record.
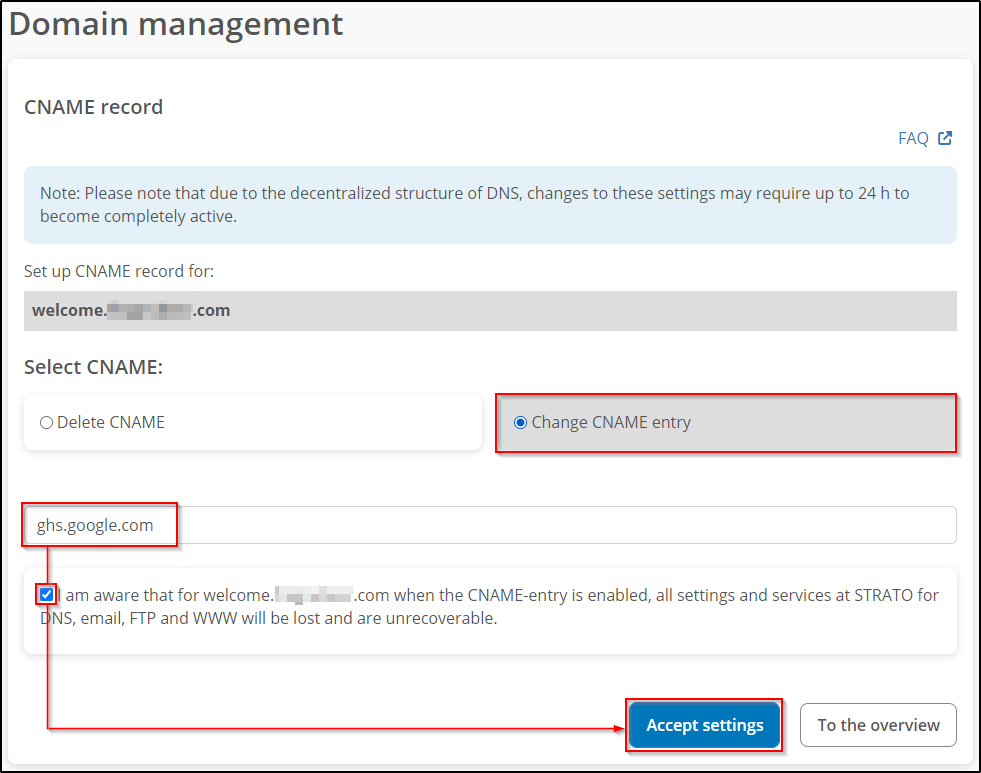
Please enter the desired destination address in the input field, tick the box next to the information text and Accept settings.
Restrictions when using a CNAME entry
Online-based services such as GoogleApps or Microsoft Online Services (Microsoft 365) require the entry of a CNAME entry for the DNS. You can enter this entry for a subdomain in the STRATO customer login of your package.
The entry of a CNAME record has a direct impact on services (e-mail, DNS, FTP, WWW) that are operated under this domain.
- If a CNAME entry is to be activated for a domain name, no other DNS entry may exist for the domain name ("either-or").
DNS entry must not exist for the domain name ("either-or"). Querying DNS servers
would otherwise not know whether to interpret the domain name as an alias or instead (in the case of an
the IP address of the web server instead (in the case of an A record). The "either-or"
restriction for CNAME records is a prerequisite for consistent information from the DNS.
from the DNS. - CNAME entries are only available at subdomain level, as no DNS entry is specified here.
is specified here. For a domain, the name servers of the provider (STRATO) are stored at the respective registry (e.g. ICANN).
name servers of the provider (STRATO) are stored for a domain. These entries are made via so-called NS
records. This means that a DNS entry already exists for the domain name. As this entry
cannot be deleted, it is not possible to use it for CNAME entries at domain level.
possible.
Effects of a CNAME entry
All existing DNS settings except CNAME are inactive and can no longer be activated. The option is only available again in the STRATO customer login when the CNAME entry is removed.
How can I configure the DMARC record?
DMARC is a mechanism designed to reduce the misuse of emails, as occurs in the context of phishing.
You can make the DNS setting in the customer login. After logging in, select the menu items Domains → Domain management.
In the domain overview, select the cogwheel next to the respective domain.
On the following page, you can click on the DNS tab and then manage the TXT and CNAME records.
DMARC is already activated at STRATO. If you want to deactivate this, then select the option "No STRATO DMARC rule".
Like DKIM and SPF, the DMARC rules (policy) are stored publicly in the DNS. There is a TXT record with the prefix _dmarc, which must be filled with certain values. DMARC offers you three different procedures if the SPF _and_ DKIM check both return a negative result:
1. Policy none: The email is delivered unchanged. However, there may be a report for the error (if the mail server supports this).
2. Policy quarantine: The e-mail is treated as spam. As the recipient, you determine what this means. With STRATO, you can choose between four treatments for received emails:
Never reject spam (= delivery to the inbox like a normal message)
Mark the subject of spam mails in the inbox
Place spam in the spam folder
Always reject spam: The message is rejected and the sender receives a corresponding message.
3. reject: Messages are rejected and the sender receives a corresponding message.
Make the following settings for DMARC:
Type: TXT
Prefix: _dmarc
Value: v=DMARC1; p=quarantine; pct=100
Instead of quarantine, write none or reject depending on the selected policy, as described above.
Further information on DMARC can be found here:
How can I activate DMARC with STRATO?
How can I configure the Dynamic DNS?
DynDNS or "Dynamic Domain Name Service" is a service that allows you to set up a fixed domain name for a changing IP address.
Dynamic DNS (DynDNS) allows you to forward your domains and subdomains registered with STRATO to any computer connected to the Internet. This enables you to make Internet services (servers) such as FTP or streaming media that are operated on your own computer easily accessible.
Possible usage scenarios are:
• Access to your own computer from the road via your own domain
• Provision of own files via FTP for downloading via the Internet
• Provision of streaming media
• Operation of your own mail server on a company computer, etc.
You can make the DNS setting in the customer login. After logging in, select the menu items Domains → Domain management.
In the domain overview, select the cogwheel next to the respective domain.
On the following page, you can click on the DNS tab and then manage the Dynamic DNS.
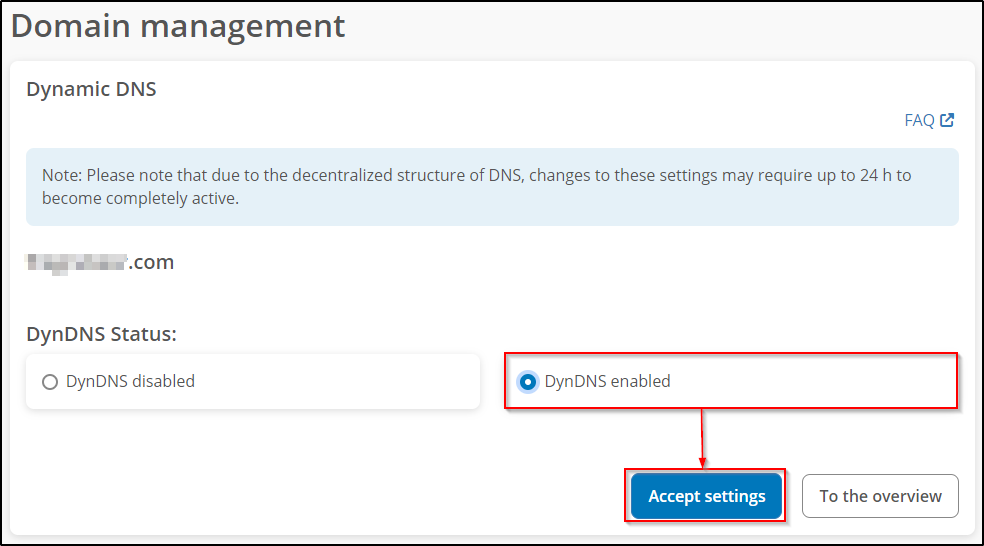
On the following page, you can specify the Dynamic DNS for the selected domain.
Complete the settings by clicking on Accept settings and repeat this process for each of your domains or subdomains for which you want to activate DynDNS.
You can assign a separate password for DynDNS yourself under Security and Set passwords. If you do not set a password, the master password will be used automatically.
Set up DynDNS on your target computer
To enable your computer to report its current IP address to our DNS server, you need to install a DynDNS client on your computer to perform this task. There are many programmes available for this task.
Our DynDNS server uses the DynDNS v2 protocol from dyndns.org for the DynDNS update. Your DynDNS client requires the following information in order to automatically update the IP address:
• Server: https://dyndns.strato.com/nic/update
• Host: The domain or subdomain to be redirected (z. B.: mypc.desiredname.de)
• User: One domain from your package (e.g.: desiredname.de)
• Password: Your Dynamic DNS password, which you can assign in the STRATO customer login
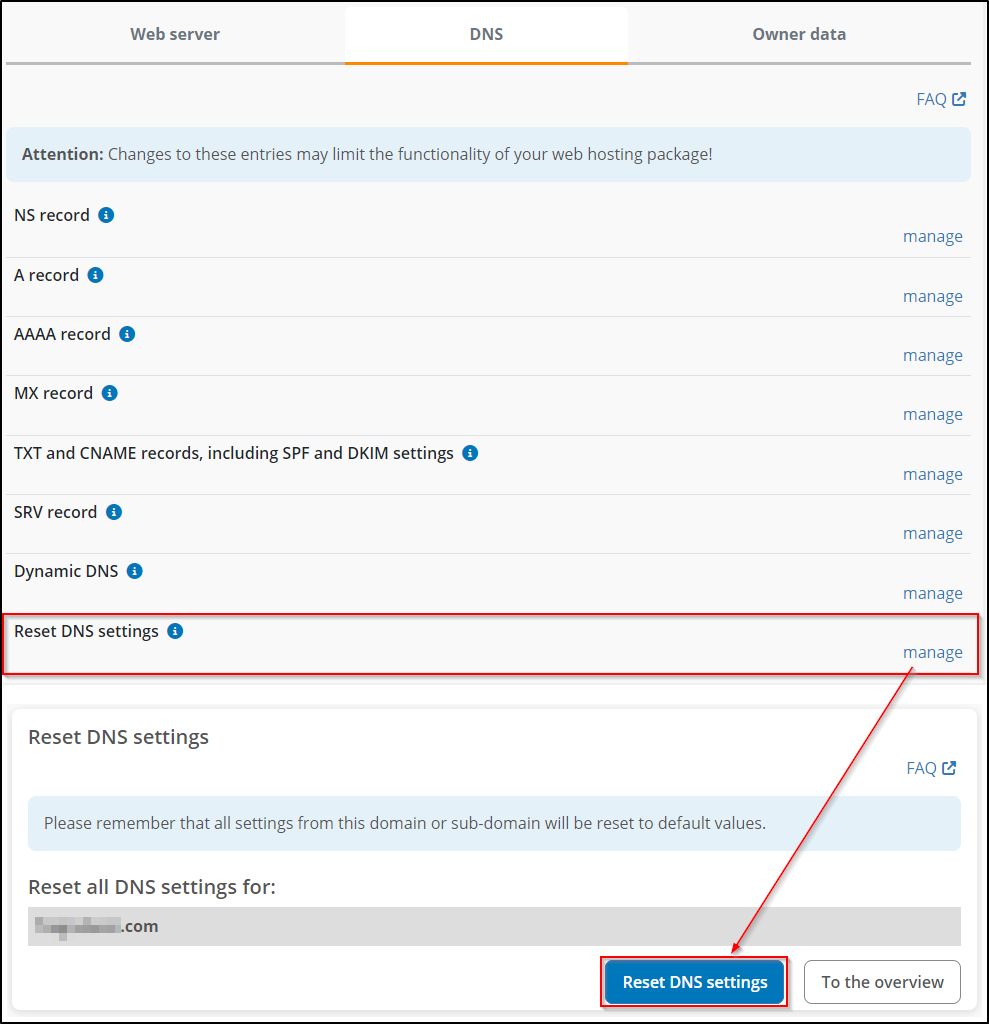
How can I reset the DNS settings?
If you want to reset all DNS entries for the selected domain, there is a suitable function for this.
Please note that all settings for this domain or subdomain will be reset to the default values. The DNS entries can then no longer be restored, except by re-entering them.
