This is how you can use our database
In order to manage, process and access large data quantities, databases are important tools for efficient usage. Databases are particularly important for websites with dynamic content. MySQL is one of the most popular open source database management systems.
Available databases in your hosting package
The number of MySQL databases contained in your package can be viewed directly in your Customer Service Area. To do this open the menu option Your Package. In the Information about your Technical Features area, you will have an overview of the available databases and databases in use from your package.
Tip: If the number of available databases is exhausted, you can either upgrade the entire package with all features or click on "+ Upgrade" to upgrade the respective feature individually.
Create and manage a database
Create a database

 Our recommendation for good passwords
With a click on Create database, this database is created and then appears in the overview, where it can now be managed. The names for the database were automatically defined according to a pattern and later serve as information for using the database with your website.
Database name: dbs####### / Username: dbu#####, where "#######" is replaced by a number.
Older databases still have the scheme: DB####### and U#######
Manage a database
If you want to manage an existing database, select the desired package in the STRATO customer login via your package overview. Then click on Databases and Webspace -> Database Administration on the left.
If you have now selected a database with the check mark, the options Delete, Change password and Change Comment are released above the table.
Delete a database
If you no longer need a database, you can remove it again with the Delete button.
 Please remember that when deleting a database, all content and any existing automatic backups are lost as well.
PHP access to the MySQL-database
PHP is available to you in all current hosting packages in the common versions. For a connection via PHP you need to specify the database server: database-0123456789.webspace-host.com
For the most common Content Management Systems (CMS), you will usually always need the following basic information:
| Database(name): | dbs##### |
| Username: | dbu###### |
| Password: | your self-assigned password in the database administration (see above) |
| Database type: | MySQL or MariaDB |
| Server(name): | database-0123456789.webspace-host.com (see under 'Details' in your database management) |
Example Connect:
$dsn = 'mysql:host=database-0123456789.webspace-host.com;dbname=dbs#######';$user = 'dbu#######';$password = 'yourpassword'; try { $dbh = new PDO($dsn, $user, $password); echo "Server connection successful"; } catch (PDOException $e) { die("Connection not possible, please check data!: " . $e->getMessage()); }
If the connection to the database is no longer needed, it can be closed with the function $dbh = null;
Please note that specifying the server "localhost" is not possible and will result in an error.
An example script showing what a connection establishment may look like in PHP can be found here. Please enter the corresponding information on your database between the quotation marks after db_user, db_password and db_name.
<?php// Access data$db_server = 'database-0123456789.webspace-host.com';$db_name = 'dbs#######';$db_user = 'dbu#######';$db_password = 'yourpassword';// Connectiontry { $dbh = new PDO("mysql:host=$db_server;dbname=$db_name", $db_user, $db_password); echo 'Server connection successful';} catch (PDOException $e) { die('Connection not possible, please check data!: ' . $e->getMessage());}?>
Administration with phpMyAdmin
Go back to the database administration in your package in the Customer Service Area and click on Start PhpMyAdmin to the right of the database.
A new window will open where you can edit your database.

You do not need to make any further settings. All available and allowed commands of phpMyAdmin are already preconfigured by us.
A detailed documentation about phpMyAdmin can be found here or also under the menu icon "Documentation" in the phpmyadmin top left. The english-language reference about all commands you will find here: https://dev.mysql.com/doc/refman/8.0/en/
Database Backups
Automatic Backups
Backups are necessary - whether hourly, daily, or weekly. In addition to your files and directories, STRATO also backs up your databases.
The creation of these backup copies takes place automatically in the background with Backup Control and the intelligent storage architecture. The Backup from STRATO will be available to you and allows you to independently access the backup copies of your databases - made at multiple points in the past!
You only need an SSH program to access the backup copies.
After establishing connection via SSH with the free PuTTY program, the mysqlbackups tool is available, which shows you a list of available backups. In the following, we show you how you can access your database backup files via PuTTY.
 You can download PuTTY here
To access the backup and download it, for example, please go to the menu item Database Administration in the STRATO Customer Service Area.
The table shows you an overview of your databases where you will also find the function Display backups.

The next page shows you a list of all current backups. There you can use the Back up and download to create a temporary web space and the access data for it, so that you can then download the file using an FTP program.

This temporary web space is available for 24 hours after creation. The access data is also only valid for this period.

Our article also accompanies you on this: How to use SSH/SFTP?
Backup database (export)
Please use the Export menu option on the right side. As the type of export, please select the option Adjusted - show all possible options and then under Output select the option Save output in file.
Normally, you can leave the rest of the presets. Compression is a good idea for a larger database. By clicking on the OK button, your database backup will be offered for download.
Restore database (import)
After you have connected to the desired database via phpMyAdmin through the database administration, first click on the Databases tab and select the database of yours in which the import should be carried out.
If yes, remove this line so that the import can be carried out without restrictions.
After this, please click directly on the Import, tab in order to start the database import.
Subsequently, please select Search in order to select your locally saved database backup. Then click on OK, in order to start the import.
After a few seconds, it will show you that the database was successfully restored. This can be seen through the output: The import was completed successfully.
Export via SSH

When the connection to the server has been established, your login name and password will be requested.
Enter a domain from your package as the login name, for example desiredname.de. Confirm the input by pressing the return key. Enter your ssh password that you assigned in the customer service area as the password. The password is not displayed during input.

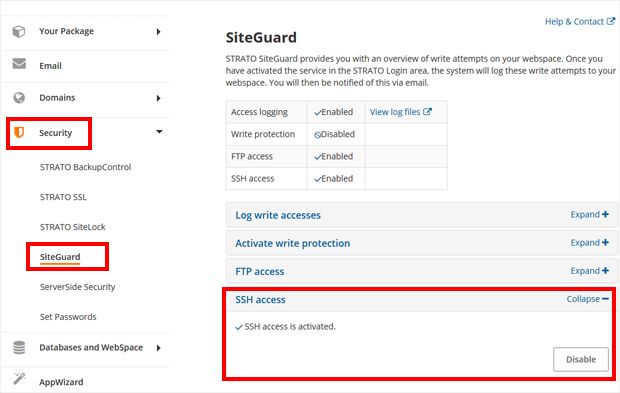
What is STRATO SiteGuard and how do I set it up?
If you have successfully logged in, your domain name will appear in the next line, followed by an "angle bracket", which means that you can execute "commands". Enter the following command after it to call up the MySQL monitor to write the contents of the database to a file:
mysql -h SERVER -u USERNAME -pPASSWORD |
Confirm the input by pressing the return key. It will ask for your password. This is the database password you chose in the customer login. After pressing return, you will receive a notification that you are now in the MySQL monitor and will see the following prompt: mysql>.
You can now execute the desired MySQL commands, for example: "SELECT * FROM addresses", in order to display the entire "Addresses" table. The first time you open it, however, you have to first create tables for the database.
mysqldump dbs### --add-drop-table -h database-0123456789.webspace-host.com -u BENUTZERNAME -pPASSWORT > backup.sql |
In this example the backup is stored in the backup.sql file in the root directory of your web space. You can change the file name if necessary.
The official homepage from MySQL with comprehensive information can be found under http://dev.mysql.com/doc/
If you have an old database with the name "DB..." and user "U...", then run the command:
mysqldump DB1234567 --add-drop-table -h database-0123456789.webspace-host.com -u U1234567 -p > backup.sqlto the error:
*mysqldump: Error: 'Access denied; you need (at least one of) the PROCESS privilege(s) for this operation' when trying to dump tablespace*
This is due to a bug in MySQL itself, which can be read here:
https://dev.mysql.com/doc/
The rewritten command serves as a workaround:
mysqldump DB1234567 --no-tablespaces -h database-0123456789.webspace-host.com -u U1234567 -p > backup.sqlImport via SSH
To list the automatic backups from backup control please put in the following command in an SSH-Tool like PuTTY:
| mysqlbackups dbu###### |
You will now receive a list with all of the available backups in the form mysql_[DATE]-[TIME].
If you would like to write the dump of an existing backup to a file on your web space, please enter the following command:
| mysqldump --add-drop-table -h mysql_[DATE]-[TIME] -u [user name] -p [database name] > [file name].sql |
This command creates a file with the content from the database backup and saves this on the topmost level of your web space.
Example: You would like to save the backup from 11/5/2009 in a file by the name of backup.sql on your web space. The name of your database is "012345".
The command would then be as follows:
| mysqldump --add-drop-table -h mysql_05.11.2009-16:00 -u dbu012345 -p dbs012345 > backup.sql |
After you have pressed [ENTER] you will be asked to enter the password for your database.
The following command line now writes the contents of the backup.sql file to the database. The file must be located on your web space in the root directory.
mysql -h database-0123456789.webspace-host.com -u USERNAME -pPASSWORD dbs### < backup.sql |
Please replace USERNAME and PASSWORD with the data from your database dbu### and dbs### that was assigned to you when you created it.
If your password contains special characters, such as "!, ?, $" or similar, please just skip PASSWORD and execute the command. You will be automatically prompted for the password and can then enter it directly. The command then looks like this:
COMMAND: mysql -h database-0123456789.webspace-host.com -u USERNAME -p dbs### < backup.sqlOUTPUT: Enter password: |
Please note: If a compressed database backup with the file name backup.sql.gz is available to you, it must be unpacked beforehand. To do this, please enter the following command:
gunzip backup.sql.gz |
Please replace backup.sql.gz with the filename which is located on your webspace.
Alternative restore with MySQLDumper
Since the size of the backup file may not exceed 2048 KB when restoring through phpMyAdmin, customers without SSH access reach their limits. Software solutions like mysqldumper or the BackupDB tool can help here. Mysqldumper can temporarily save the backup status before reaching the size and/or time restriction and continue to record after an automatic restart.
 Download MySQLDumper
Detailed instructions on how to install mysqldumper are available under the following Link with a video.
After you have completed the installation and configuration of mysqldumper, please click on the left side on the Administration menu option.
After this, click on the Search.." button, so that you can select the backup file that you want to use for the restore. After you have selected the file, click on the Upload file , button on the right next to it so that the file is uploaded to the system.
Through the area highlighted in point, you will be able to see that the uploading of the file was successfully executed, as the number, date and time of the uploaded file will be shown to you.
Now click on the left side in the menu on the option Restore and then on the Files from other programs link.
This will give you the option to select the backup file you just uploaded by placing a dot in front of the filename filename.sql. Finally, click on the Restore button.
Now the next dialog window asks you to confirm that the content of the backup file should be restored with the selected database.
During the last step before restoration, you now have the option of selecting the coding of the backup file ,if you did not use standard coding. Finally, you can start the restoration by pressing the Restore button.
In the following image, you will see an active restoration process from a backup file.
Once the restoration process is complete, the program will congratulate you and you will receive information that the database was completely restored.
Memory limitations for databases
If a database has reached the maximum size of 2 GB, you will see a warning sign next to the database in question in your Database Administration in the Customer Service Area.
Click on Start PhpMyAdmin to the right of the database.
In the phpmyadmin administration, you can see all the files that are in the database under the Structure item. Here you can delete all the files that you no longer need or are obsolete.
Select the appropriate folder in the table that you no longer need (e.g. Archive) and click Delete in the appropriate column.
Once you have deleted your unneeded files, you still need to optimize the table. To do this, please proceed as described in the following paragraph.
Optimize your database performance
To improve and maintain database performance, we recommend that you optimize your database tables at regular intervals. We advise this especially if you have deleted extensive parts of a table or made many changes to a table with variable length records (e.g. VARCHAR, TEXT columns, etc.).
For optimization, please click on the menu items Databases and Webspace and Database Administration on the left side in your package. An overview page with your created databases will then appear in the right main window. Via the button Start PhpMyAdmin you get into the phpMyAdmin interface.
Scroll all the way down and click Select All to select all tables. Finally, select Optimize Table from the pull-down menu. Your database will now be optimized automatically.
In this section you will learn how to restore databases that have been deleted with the drop database command via SSH or script.
A database can only be restored in this case if:
- The deletion was done via a PHP script
- The deletion was done via SSH
The database can NOT be restored if:
- The deletion in the STRATO customer login took place.
All you need to create the database is your domain name, your ssh password, the database name and an SSH client, e.g. PuTTY.
In the following step, establish the SSH connection to the job in which the database was located.
Once you have successfully established the login, please use the following command (1):
mysql -h database-0123456789.webspace-host.com -u [Username] –p |
Now enter your used database password (2). Mysql> appears under PuTTY. Continue with the following command (3):
create database [Databasename]; |

The database has now been created again and is accessible via phpmyadmin.
How do I migrate my database to the current version?
Since new databases are automatically created with the current version, we only follow steps already described above:
- Export the old database
- Create a new database
- Import der zuvor exportierten Sicherungsdatei in die neue Datenbank
You can, for example, transfer the contents of a MySQL database version 5.x to a MySQL database version 8.x.
Important: Before creating a backup of your MySQL database 5.x and then restoring it to your MySQL database 8.x, please note that some column and/or table names are prohibited in MySQL 5 or 8.
Please also note that you also make the changes for the new database in the corresponding .php files, otherwise it will not work.
Example: The .php file in which the configuration settings for the database are stored is: data.php.
The following settings must be changed:
- Username and password (if you have changed the password) to log in to the database server
- Name of the database
If you have a current hosting package, you will see the
database name: dbs####### and the
user name: dbu####### will look like this.
After you have tested the functionality of your website with the new database, you can delete the old database via the customer login. Do not forget to add the new database information for your installation. We will explain how to do this using the WordPress example.
Example: Configuration Wordpress database
In the installation directory (web space), look for a file called wp-config.php:
// ** MySQL settings - You can get this info from your web host ** //
/** The name of the database for WordPress */
define('DB_NAME', '[name_of_your_database]');
/** MySQL database username */
define('DB_USER', '[username_for_your_database]');
/** MySQL database password */
define('DB_PASSWORD', '[password_for_your_database]');
/** MySQL hostname */
define('DB_HOST', 'database-0123456789.webspace-host.com:');
The DB_Host remains the same, the three upper entries must be replaced by the new database information.
Troubleshooting
PhpMyAdmin fails? Use SSH!
If the export/import via PhpMyAdmin fails, you must switch to SSH. Above we describe how to use SSH and also the software MySQLDumper.
Common mistakes/questions
ERROR 1118 (42000) at line xxx: row size too large
→ InnoDB tables that are no longer valid due to the WaaS database having InnoDB strict mode enabled. Here you have to update the table definitions and try again.
Read https://mariadb.com/kb/en/troubleshooting-row-size-too-large-errors-with-innodb/
ERROR 1416 (22003) at line 123: Cannot get geometry object from data you send to the GEOMETRY field
→ Spatial data may be corrupt. Fix or remove it.
Read https://wordpress.org/support/topic/cant-migrate-data-table-due-to-corruption/
How can I update the "Table Definitions"?
https://mariadb.com/kb/en/troubleshooting-row-size-too-large-errors-with-innodb/
How do I repair the spatial data? What can happen if you delete them?
https://wordpress.org/support/topic/cant-migrate-data-table-due-to-corruption/
What if I have gone through all the steps and still get one of the above errors?
Please contact us in that case.
For other error messages, you can use the official MySQL documentation:
https://dev.mysql.com/doc/refman/5.7/en/
https://dev.mysql.com/doc/refman/8.0/en/
Restrictions
- Interleaved queries according to the "SELECT * FROM table1 WHERE id IN (SELECT id FROM table2);" pattern are not possible.
- SELECT... INTO TABLE is not possible